Clone this project and run npm i to install dependencies
Copy the .env file you want to migrate to the root of this project (This app runs on your machine and uses official AWS SDK to upload, your parameters won’t go anywhere else)
In the .env file, add a dash ‘-‘ before each secure env variable name (or customize this in app.js) to encrypt it with the provided KMS key ID.
In app.js Specify AWS region, SSM parameters path, and KMS key ID encrypt secure strings.
If you haven’t used AWS CLI on your machine before and AWS IAM is not configured, specify IAM accessKeyId and secretAccessKey in app.js.
Notes
All Parameters will be of standard tier and and have a DataType of text.
This will not overwrite any existing parameters you have on your AWS region. If You want to overwrite, set the overwrite flag in app.js to true.
TODOs
Add screenshots to README
Add sample .env
Add support for parameter description {{ my paramter Description }}
vkQuake is a port of id Software’s Quake using Vulkan instead of OpenGL for rendering. It is based on the popular QuakeSpasm and QuakeSpasm-Spiked ports and runs all mods compatible with QuakeSpasm like Arcane Dimensions.
Improvements over QuakeSpasm include:
Much better performance with multithreaded rendering and loading
The game can run at higher frame rates than 72Hz without breaking physics
A software Quake like underwater effect
Support for remastered models (in MD5 format) if using data from the 2021 rerelease
Support for standalone MD5 models, not only as .mdl alternatives
True color skins support (.png, .tga, .jpg) for MD5 models, including fullbrights
Dynamic shadows (requires a GPU with ray tracing support)
Better color precision reducing banding in dark areas
Native support for anti aliasing and anisotropic filtering
8-bit color emulation
Scaling for pixelated look
Mods menu for easy mod loading
More modern protocol to avoid certain movement issues (from QSS)
WAD3 format support, allowing per-texture palettes for more colorful levels (more info)
Installation
Windows and Linux binaries can be found in Releases.
MacOS (both Apple Silicon and 64-bit Intel) binaries are at Mac Source Ports.
Windows
It is recommended to use the installer on Windows. This sets up start menu entries for the original and remastered Quake versions. Save data and config files will be written to the user folder (%APPDATA\vkQuake) instead of the Quake data folder.
Otherwise copy all files inside the vkquake-<version>_win64 or vkquake-<version>_win32 folder in the zip to the Quake base directory. Overwrite any existing files. Afterward to run the game just execute vkQuake.exe.
Linux
Copy all files inside the vkquake-<version>-linux64 folder in the tar archive to the Quake base directory. Overwrite any existing files. Run vkquake.AppImage.
Note
Make sure all data files are lowercase, e.g. “id1”, not “ID1” and “pak0.pak”, not “PAK0.PAK”. Some distributions of the game have upper case file names, e.g. from GOG.com.
OpenBSD
OpenBSD includes vkQuake in the standard package repositories since version 6.6.
If you’re running OpenBSD 6.6 or greater, you can install the package with:
$ pkg_add vkquake
FreeBSD
FreeBSD includes vkQuake in the standard port/package repoistories since version 11.3.
If you’re running FreeBSD 11.3 or greater, you can install the package with:
# pkg install vkquake
Alternatvely, you can build vkQuake with FreeBSD’s port collection:
$ cd /usr/ports/games/vkquake
# make install
Quake ‘2021 re-release’
vkQuake has initial support for playing the 2021 re-release content. Follow installation instructions as above but copy the files into the rerelease folder.
Vulkan
vkQuake shows basic usage of the API. For example it demonstrates render passes & sub passes, pipeline barriers & synchronization, compute shaders, push & specialization constants, CPU/GPU parallelism and memory pooling.
Endianness
vkQuake only supports little-endian systems.
The reason is, all known existing Vulkan-capable systems in the wild are little-endian. Consequently, all big-endian support from QuakeSpasm has been effectively removed.
vkQuake wouldn’t even start on an big-endian system, outputing a fatal error.
Building
Note
You will need at least Vulkan SDK version 1.2.162 or newer. When building for Linux this is not always the case for the SDK provided by the distribution. Install the latest LunarG SDK if necessary.
Windows
Clone the vkQuake repo from https://github.com/Novum/vkQuake.git
Now go to the Quake directory and compile the executable:
cd vkQuake
meson build && ninja -C build
Note
The Meson version needs to be 0.47.0 or newer. For older distributions you can use make:
cd vkQuake/Quake
make -j
Meson is the preferred way to build vkQuake because it automatically checks for out of date file depenencies, is faster and has better error reporting for missing dependencies.
Note
vkQuake 0.97 and later requires at least SDL2 2.0.6 with enabled Vulkan support. The precompiled versions in some of the distribution repositories (e.g. Ubuntu) do not currently ship with Vulkan support. You will therefore need to compile it from source. Make sure you have libvulkan-dev installed before running configure.
MacOS
To compile vkQuake, first install the build dependencies with Homebrew:
Now go to the Quake directory and compile the executable:
cd vkQuake
meson build && ninja -C build
Note
The Meson version needs to be 0.47.0 or newer.
Optional – Music / Soundtrack
Note
This section only applies to older releases. For the 2021 re-release music will work out of the box.
The original Quake had a great soundtrack by Nine Inch Nails. Unfortunately, the Steam version does not come with the soundtrack files. The GOG-provided files need to be converted before they are ready for use. In general, you’ll just need to move a “music” folder to the correct location within your vkQuake installation (.e.g /usr/share/quake/id1/music). Most Quake engines play nicest with soundtracks placed in the id1/music subfolder vs. sound\cdtracks
QuakeSpasm, the engine vkQuake is derived from, supports OGG, MP3, FLAC, and WAV audio formats. The Linux version of QuakeSpasm/VkQuake requires external libraries: libogg or libvorbis for OGG support, libmad or libmpg123 for MP3, and libflac for FLAC. If you already have a setup that works for the engine you’re currently using, then you don’t necessarily have to change it.
Generally, the below setup works for multiple engines, including Quakespasm/vkQuake:
The music files are loose files, NOT inside a pak or pk3 archive.
The files are placed inside a “music” subfolder of the “id1” folder. For missionpack or mod soundtracks, the files are placed in a “music” subfolder of the appropriate game folder. So the original Quake soundtrack files go inside “id1\music”, Mission Pack 1 soundtrack files go inside “hipnotic\music”, and Mission Pack 2 soundtrack files go inside “rogue\music”.
The files are named in the pattern “tracknn”, where “nn” is the CD track number that the file was ripped from. Since the soundtrack starts at the second CD track, MP3 soundtrack files are named “track02.mp3”, “track03.mp3”, etc. OGG soundtrack files are named “track02.ogg”, “track03.ogg”, etc. FLAC soundtrack files are named “track02.flac”, “track03.flac”, etc. WAV soundtrack files are named “track02.wav”, “track03.wav”, etc.
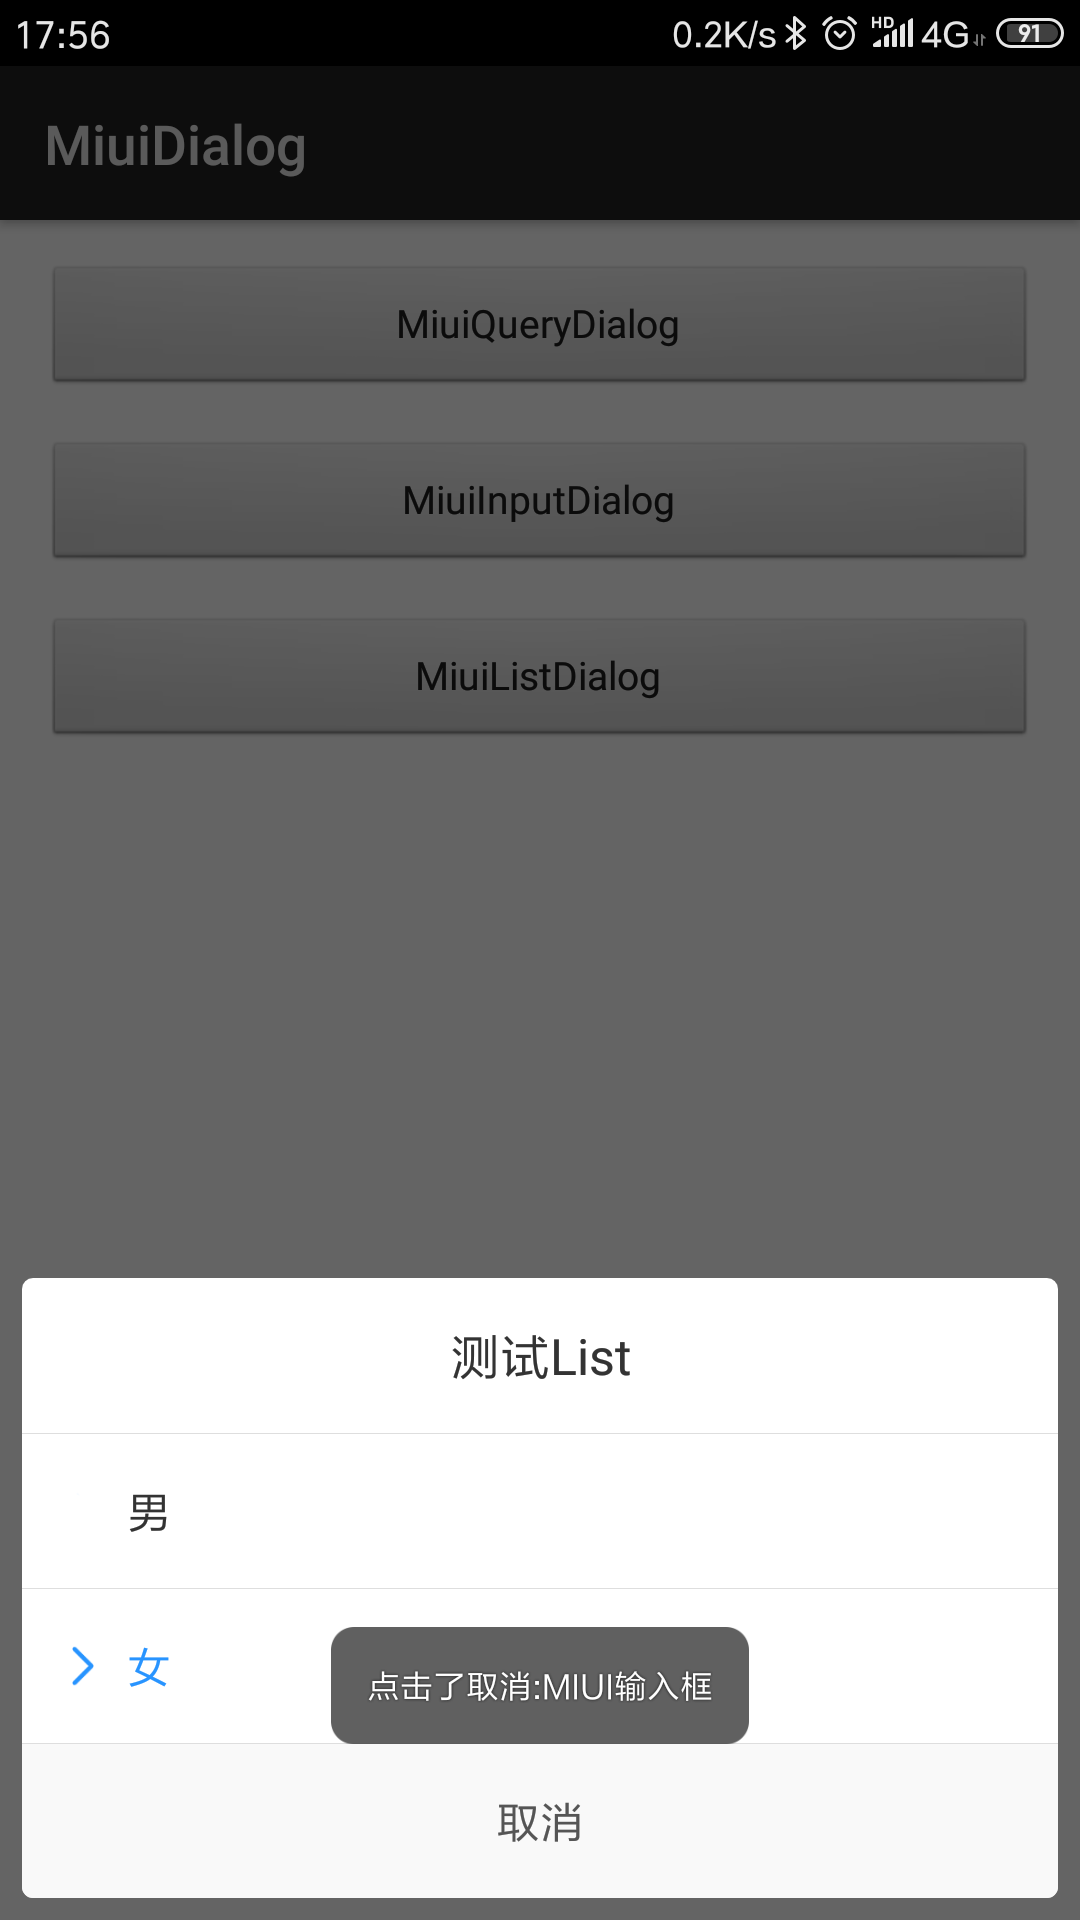
ArrayList<String> arrayList = new ArrayList<>();
arrayList.add("男");
arrayList.add("女");
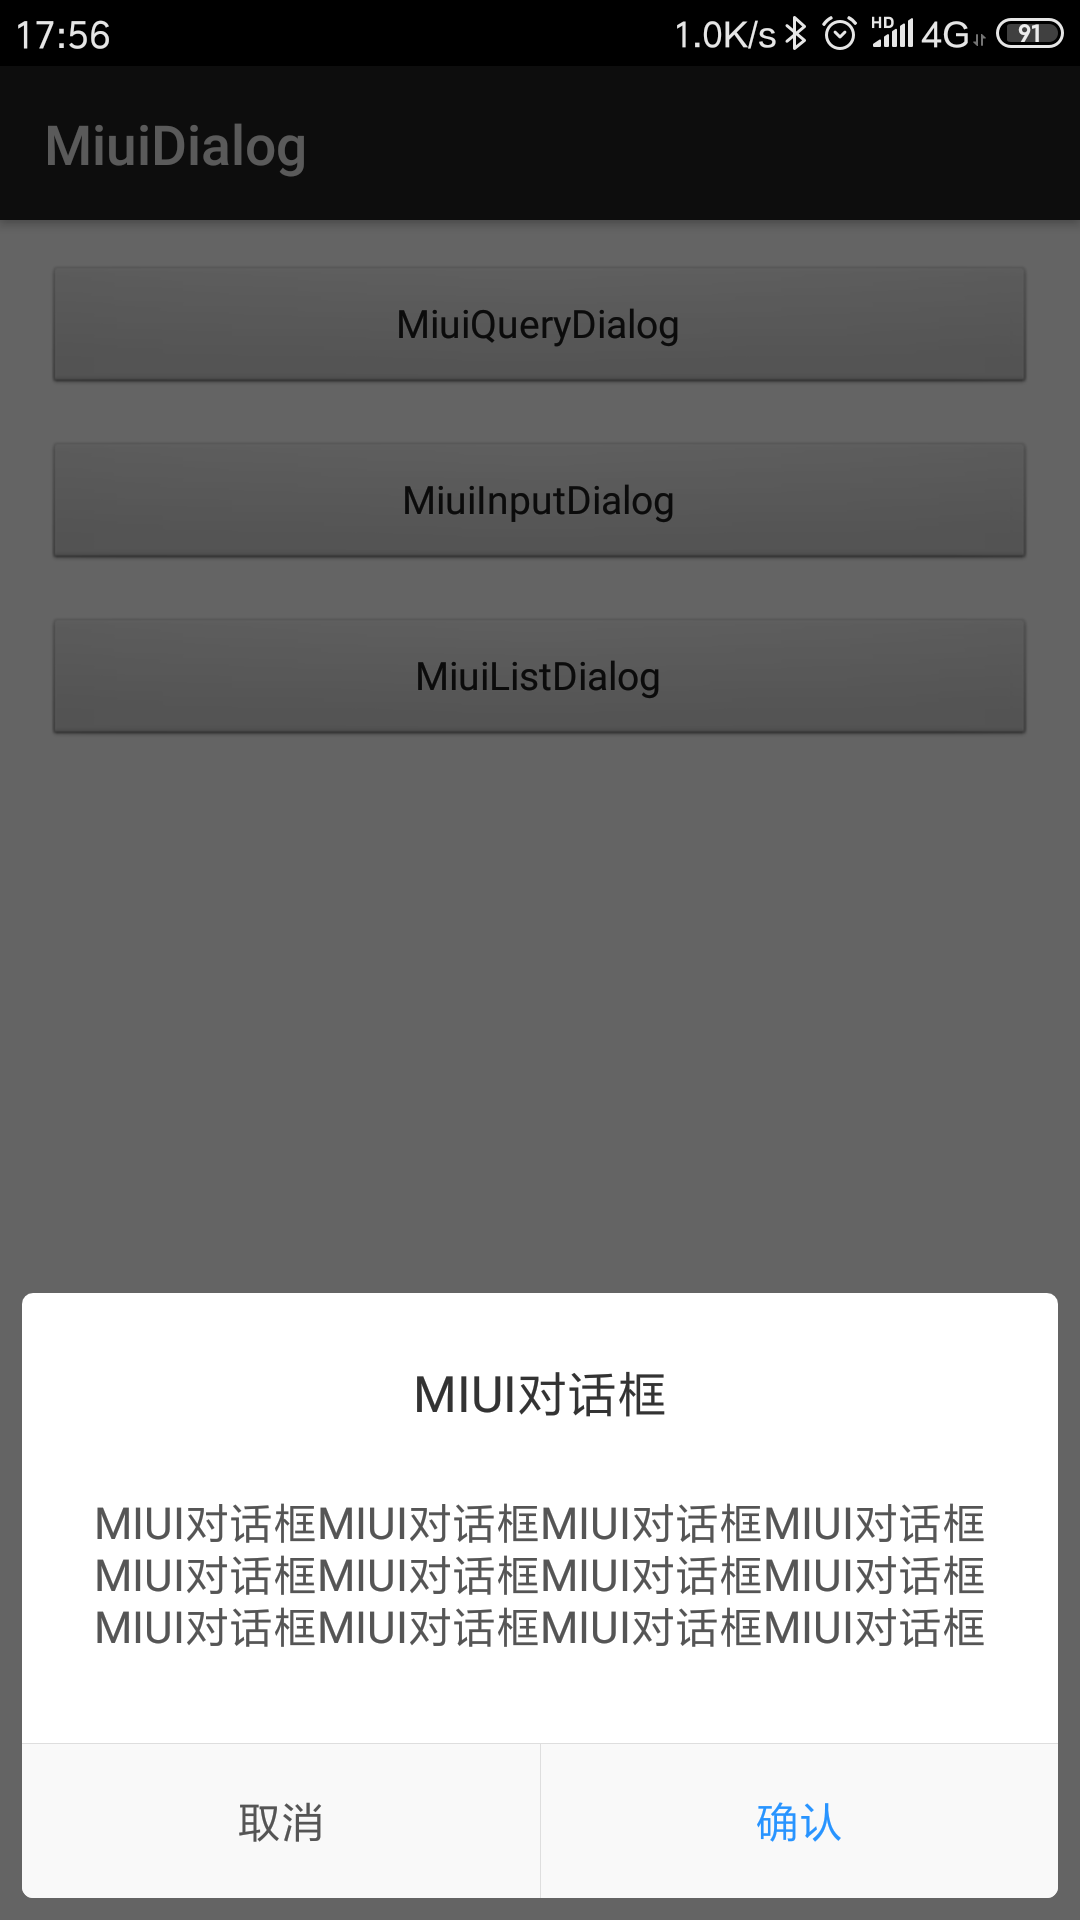
new MiuiListDialog.Builder(this)
.setCancelable(false)//是否点击外部消失
.setTitle("测试List")//标题
.setList(arrayList)//列表数组
.setSelector(1)//选中项,不可大于数组
.setListListener((position, content) -> Toast.makeText(MainActivity.this, "点击了选项:" + position + content, Toast.LENGTH_LONG).show())//点击列表项监听
.setPositiveButton("取消", (position, content) -> Toast.makeText(MainActivity.this, "点击了取消:" + position + content, Toast.LENGTH_LONG).show())//按钮
.show()//显示
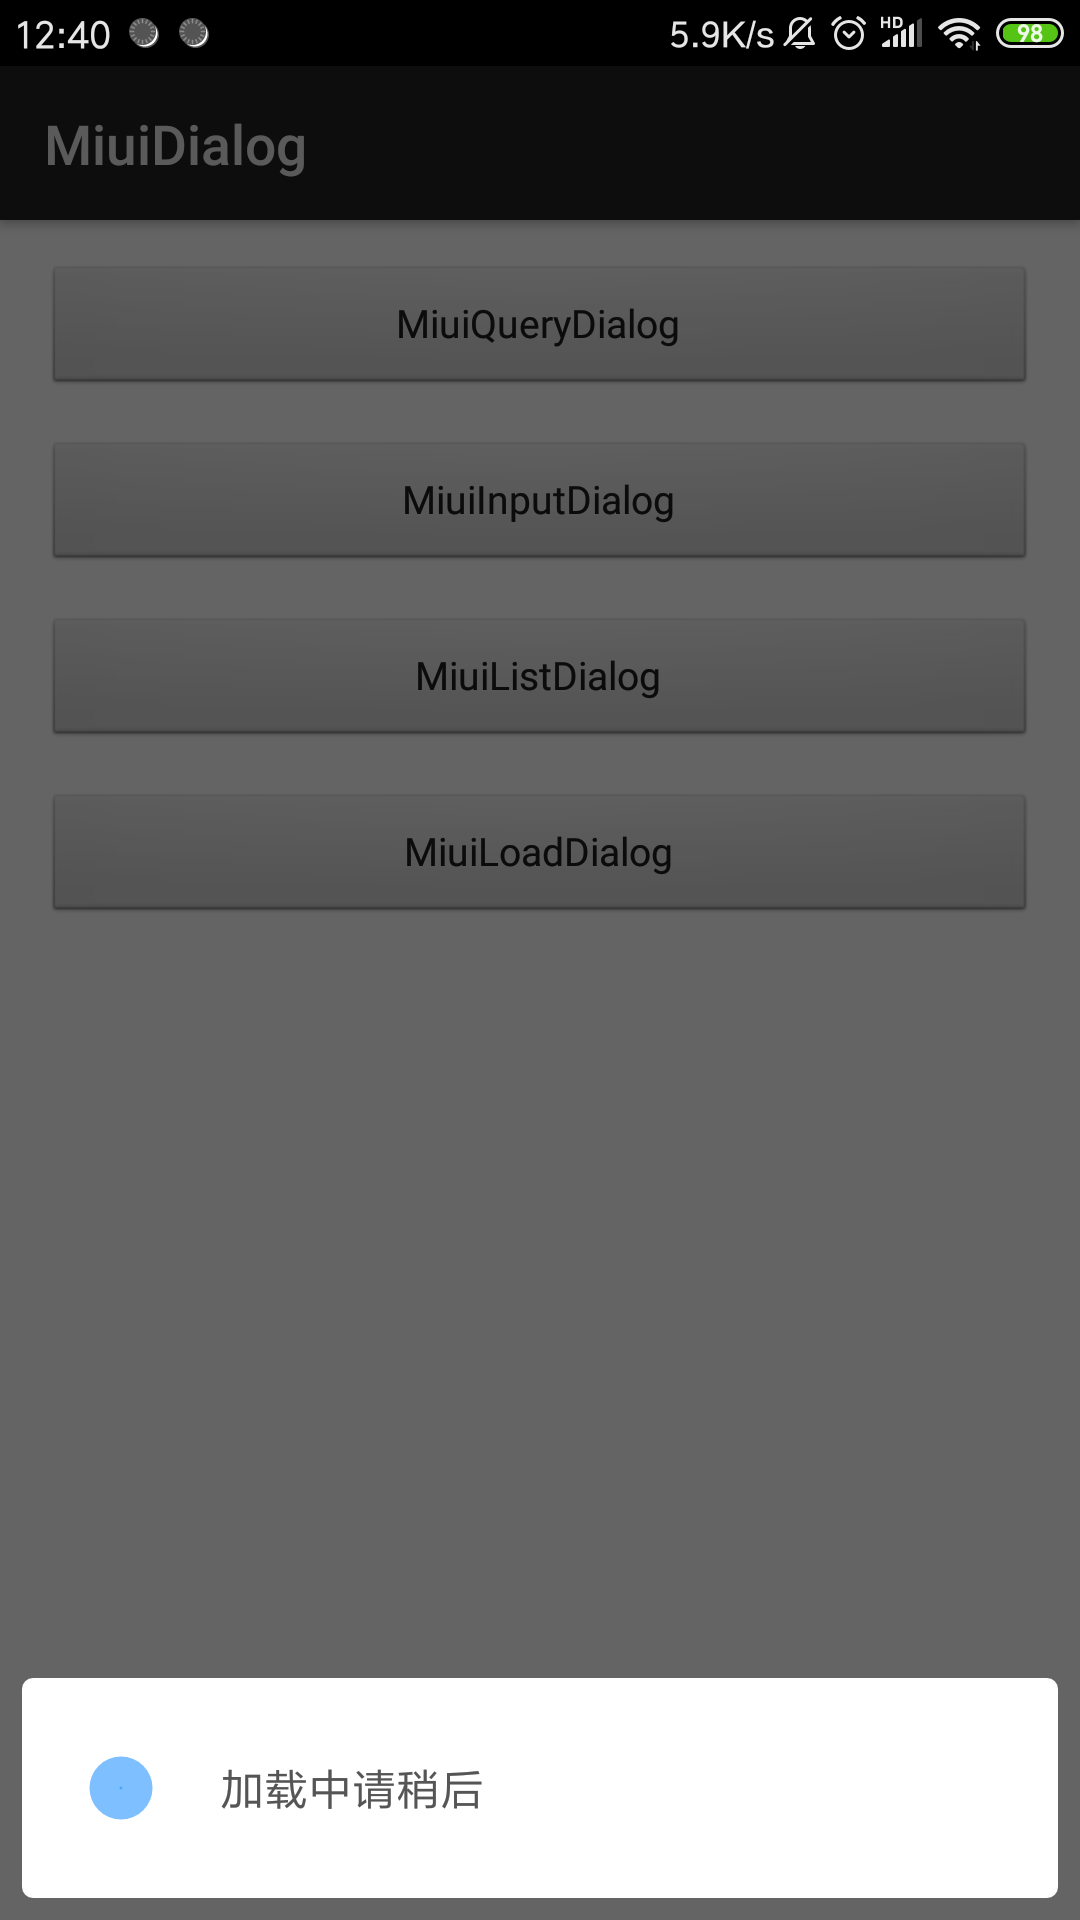
进度框
new MiuiLoadDialog.Builder(this)
    .setCancelable(false)//是否点击外部消失
    .setContent("加载中")//内容
    .show()//显示
Licenses
Copyright 2018 oyo775881

Licensed under the Apache License, Version 2.0 (the "License");
you may not use this file except in compliance with the License.
You may obtain a copy of the License at

    http://www.apache.org/licenses/LICENSE-2.0

Unless required by applicable law or agreed to in writing, software
distributed under the License is distributed on an "AS IS" BASIS,
WITHOUT WARRANTIES OR CONDITIONS OF ANY KIND, either express or implied.
See the License for the specific language governing permissions and
limitations under the License.
The @Eg annotations tell the EgTest annotation processor to create unit tests from the method and its two examples.
They also show up in Javadoc. That way your examples are always in synch with the documentation, and you see
the tests every time you look at the source code.
Have you ever written a regular expression, tested it in a regex checker or a REPL, and then forgotten to write unit
tests for all the cases you hand tested? Sure unit tests are easy to write, but what if they were so easy to write
that you didn’t bother with hand-testing? Like this:
EgTest annotations provide testable documentation in the source code. The annotations automatically show up in
Javadoc and are automatically compiled into JUnit tests. That way, you know that the examples work.
By removing the excuses for writing tests, you may find yourself writing tests for one-off code or exploratory code.
Rather than testing in a REPL, it is easier to write a permanent unit test. Even simple one-line functions are worth a
unit test when it’s this quick and easy!
EgTest is not an excuse to avoid writing full unit tests
In some cases, especially with functional programming,
EgTest may be sufficient. EgTest should encourage you to break your complex code into small, simple, easily
tested functions. But what makes EgTest so simple is that it doesn’t try to solve all your testing needs: it’s there
to complement, not replace, full unit testing.
EgTest is not a static analysis or type constraint tool
There are other similar-looking annotations out there which extend the type system by
describing constraints, including several to describe nullability.
Some of them even enforce the constraints through static analysis.
These are extremely powerful, since they cover entire classes of errors. EgTest isn’t one of them.
EgTest is for writing examples. Examples are specific, concrete, and easier to understand—especially in complex cases.
It should be used with type-constraint annotations, dealing with the cases that they can’t handle or providing
clarification.
EgTest relies on repeatable annotations, which are a Java 8 feature.
packagecom.vocalabs.egtest.example;
importjava.util.regex.Pattern;
importcom.vocalabs.egtest.annotation.*;
publicclassExampleForReadme {
//// @Eg: given the specified input, returns the specified value. Arguments are copied verbatim into test code,// so we need to escape strings, since there could be a class named "World" in the test's scope.//@Eg(given = {"\"World\""}, returns = "\"Hello, World!\"")
publicstaticStringgreet(Stringtarget) {
return"Hello, "+target+"!";
}
// Package-private methods are fair game@Eg(given = {"1", "2"}, returns = "3")
@Eg(given = {"1", "Integer.MAX_VALUE"}, returns = "Integer.MIN_VALUE")
staticintadd(inta, intb) {
returna + b;
}
// Floating-point return types have a delta (margin of error); the default is 0.0.@Eg(given = {"1.0", "3.0"}, returns = "0.33333", delta = 0.001)
@Eg(given = {"1.0", "0.0"}, returns = "Double.POSITIVE_INFINITY")
staticdoubledivide(doublenumerator, doubledivisor) {
returnnumerator / divisor;
}
//// @EgMatch/@EgNoMatch: String pattern matching, for regular expressions or boolean functions///** * Regular expression to match address portions of typical real-world email addresses. * It does NOT attempt to match all valid RFC 2822 addresses. */@EgMatch("dleppik@vocalabs.com")
@EgMatch("dleppik@vocalabs.example.com")
@EgNoMatch("dleppik")
@EgNoMatch("dleppik@vocalabs@example.com")
@EgNoMatch("David Leppik <dleppik@vocalabs.com>")
publicstaticfinalPatternSIMPLE_EMAIL_RE = Pattern.compile("^[\\w+.\\-=&|/?!#$*]+@[\\w.\\-]+\\.[\\w]+$");
/** Boolean function wrapping {@link #SIMPLE_EMAIL_RE} */@EgMatch("dleppik@vocalabs.com")
@EgNoMatch("dleppik")
publicstaticbooleanvalidEmail(Stringemail) {
returnSIMPLE_EMAIL_RE.matcher(email).matches();
}
//// @EgException: for when failure is an option//@EgException(value = {"null"}, willThrow = NullPointerException.class)
publicstaticStringmethodWhichCannotHandleNulls(Objectthing1) {
returnthing1.toString();
}
// If you don't specify what it throws, the test passes if any Throwable is thrown.@EgException({"null", "\"hello\""})
@EgException({"\"hello\"", "null"})
staticStringanotherMethodWhichCannotHandleNulls(Objectthing1, Objectthing2) {
returnthing1.toString() + thing2.toString();
}
//// Non-static usage:// Non-static methods and variables are tested using the default zero-argument constructor// unless constructor arguments are specified//privatefinalintmin;
privatefinalintmax;
publicExampleForReadme(intmin, intmax) {
this.min = min;
this.max = max;
}
publicExampleForReadme() {
this(0, 5);
}
@Eg(given = "4", returns = "true")
@Eg(construct = {"8", "9"},
given = "4",
returns = "false")
booleaninRange(intnum) {
returnnum >= min && num < max;
}
//// Putting it all together///** * Return true if the string starts with one of the four ASCII vowels (not including Y). * @param s a non-null String with at least one character. */@EgMatch("Alaska")
@Eg(given = "\"Alaska\"", returns = "true") // Same as above@EgMatch("elephant")
@EgMatch("I")
@EgMatch("October")
@EgMatch("underground")
@EgNoMatch("yes")
@EgNoMatch("æon")
@EgException({"\"\""}) // Empty string, throws something (we don't care what)@EgException(value = {"null"}, willThrow = NullPointerException.class)
booleanstartsWithAsciiVowel(Strings) {
switch (s.toLowerCase().charAt(0)) {
case'a': returntrue;
case'e': returntrue;
case'i': returntrue;
case'o': returntrue;
case'u': returntrue;
default: returnfalse;
}
}
}
How does it work?
At compile time, EgTest’s annotation processor creates JUnit tests separate from your hand-written unit tests.
With parameters given, returns, and construct it copies Java code verbatim. Thus you can use fully qualified
names, e.g. @Eg(returns=java.time.format.DateTimeFormatter.ISO_LOCAL_DATE). Just like regular JUnit tests, the
tests are in the same package as the class being tested. For example: @Eg(given={"new MyClassInTheSamePackage(\"World\")"} returns="new MyClassInTheSamePackage(\"Hello, World!\")").
Source code for JUnit tests are generated while compiling the main code. Generated classes have names ending in $EgTest, so they do not conflict with other JUnit tests.
Groovy for easier-to-read examples
By default, Java is used whenever code is copied verbatim. This makes the generated source code easier to follow,
but all those escaped quotes can be a pain, and lists are difficult to construct. Fortunately, you can change EgTest’s
language from Java to Groovy.
Groovy lets you use single quotes to construct strings, and lists are as easy as [1, 2, 3]. For example:
As you can see, you can set the language in an annotation with language = EgLanguage.GROOVY. You can also set the
language for an entire class (and its inner classes) like this:
At the moment, Groovy only works for given and returns. Java is used to construct an object.
In Groovy mode, the unit test methods are still written in Java, but the appropriate portions call out to a Groovy
interpreter. Trivial cases which are identical in both languages, such as numerical literals, are handled with pure
Java.
Don’t annotate anonymous classes!
Because anonymous classes are constructed at runtime,
annotations within anonymous classes are not visible to the compiler. Not only is EgTest unable to create a test, it
can’t even emit a warning! As is true whenever you write unit tests, you should write a
failing test—and confirm that it fails—before making it pass.
There’s also a Kotlin example project using EgTest with Kapt, the
Kotlin annotation processor.
To try it out from source, clone this project and run ./gradlew ':junit-example:build' from the EgTest directory.
(Windows: gradle.bat should work.)
Generated source code will be in junit-example/build/generated/egTest while JUnit test results will be at junit-example/build/reports/tests/test/index.html.
Running the Java compiler from the command line isn’t recommended, but can be helpful for debugging.
To process EgTest annotations into JUnit test code, download egtest-processor-VERSION.jar and compile your source
with -processorpath [path/to/jar/]egtest-processor-VERSION.jar -Aegtest.targetDirectory=/path/for/generated/source/files.
Similarly, running with Maven should work if you configure compiler:compile with EgTest in the annotationProcessors
parameter, include -Aegtest.targetDirectory=/path/for/generated/source/files in compilerArgs, and make sure the
unit test compile includes the generated source files. EgTest is unlike most annotation processors in that its
generated source is compiled with unit tests, not with the main source code. Thus, you can’t just set generatedSourcesDirectory and be done.
This is an implementation of Spring Security to provide a simple database backed authentication method that is intended to run as a remote service such as an EJB. It was developed to provide a common service for all my web applications to authenticate user access through database configuration. The interface exposes a login using the Spring AbstractAuthenticationToken request as well as application specific methods to authenticate an application and create a login. A second login method is provided to use an application provided login request format.
Authentication is carried out using the Spring ProviderManager which is configured in a similar fashion to the following example. A full test configuration is available here
Encryption uses bcryprt through the supplied BCryptPasswordEncoder. Other functions are available in the current Spring Security release.
For convenience the project incorporates both the definition of the data model requirements and an implementation using Hibernate for a relational database design. In normal circumstances these would be separate projects and this may be easily achieved by separating out the relevant Hibernate package if required.
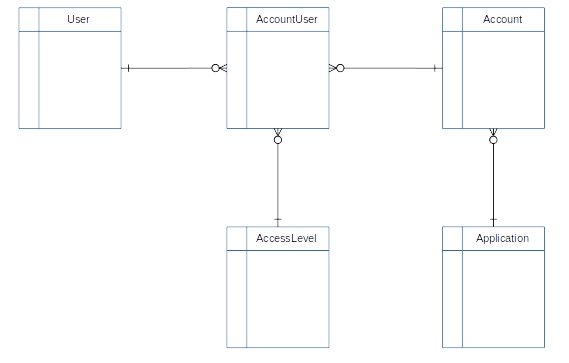
The data model is quite simple and naturally open to enhancements but suffices as a starting point. The following diagram shows that it basically implements a many-to-many relationship between users and accounts. Access can be controlled at any of the AccountUser, Account or Application levels and the Application can be closed to new sign-ups if required.
This project does not provide an interface into maintaining the data model but does implement a simple DAO pattern which provides many of the methods for this purpose. These are used in the test files which carry out the basic CRUD actions. Testing uses the HSQLDB in-memory database which means that no RDBMS needs to be installed but if DDL is required then the following is the Hibernate output (constraint names slightly amended) may be used to create a MySQL database.
create table access_level (id integer not null auto_increment, description varchar(255), primary key (id));

create table account (id integer not null auto_increment, active char(1) not null, application_id integer not null, create_date datetime, resource_name varchar(255), primary key (id));

create table account_user (user_id integer not null, account_id integer not null, access_level_id integer not null, account_message varchar(255), create_date datetime, enabled bit not null, last_access_date datetime, primary key (user_id, account_id));

create table application (id integer not null auto_increment, enabled bit not null, name varchar(255), registrationOpen bit not null, primary key (id));

create table user (id integer not null auto_increment, create_date datetime, enabled bit not null, password_salt tinyblob, user_key varchar(255), user_name varchar(255), user_password tinyblob, primary key (id));

alter table application add constraint UK_APPLICATION_NAME  unique (name);
alter table user add constraint UK_USER_USER_KEY  unique (user_key);

alter table account add constraint FK_ACCOUNT_APPLICATION_ID_TO_APPLICTION_ID foreign key (application_id) references application (id);
alter table account_user add constraint FK_ACCOUNT_USER_ACCOUNT_TO_ID_ACCOUNT_ID foreign key (account_id) references account (id);
alter table account_user add constraint FK_ACCOUNT_USER_USER_ID_TO_USER_ID foreign key (user_id) references user (id);
alter table account_user add constraint FK_ACCOUNT_USER_ACCESS_LEVEL_ID_TO_ACCESS_LEVEL_ID foreign key (access_level_id) references access_level (id);
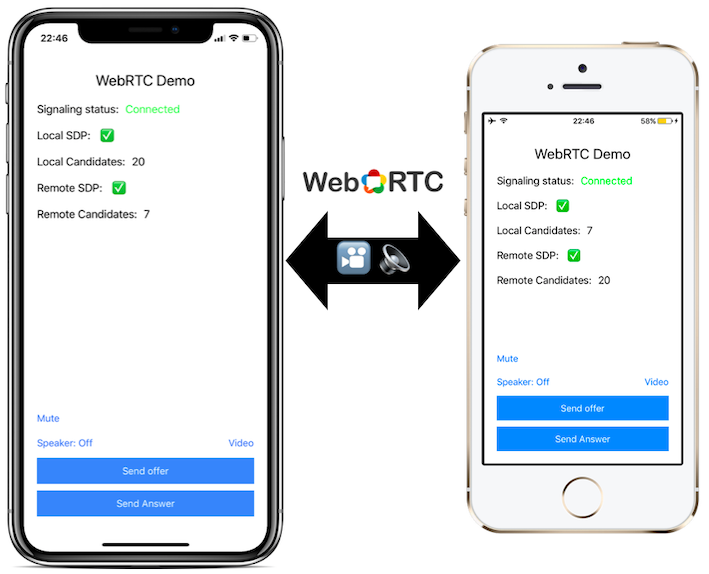
This demo app’s purpose is to demonstrate the bare minimum required to establish peer to peer connection with WebRTC. This is not a production ready code! In order to have a production VoIP app you will need to have a real signaling server (not a simple broadcast server like in this example), deploy your own Turn server(s) and probably integrate CallKit and push notifications.
Requirements
Xcode 12.1 or later
iOS 12 or later
Node.js + npm (For NodeJS Signaling server) – OR –
macOS 10.15 (For Swift signaling server)
Start the signaling server (Either NodeJS or Swift)
Navigate to WebRTC-Demo-app folder
Open WebRTC-Demo.xcworkspace
Open Config.swift and set the defaultSignalingServerUrl variable to your signaling server ip/host. Don’t use localhost or 127.0.0.1 if you plan to connect other devices in your network to your mac.
Build and run on devices or on a simulator (video capture is not supported on a simulator).
Starting NodeJS signaling server
1. Navigate to the `signaling/NodeJS` folder.
2. Run `npm install` to install all dependencies.
3. Run `node app.js` to start the server.
Starting Swift signaling server
Note: This step requires MacOS 10.15
1. Navigate to the `signaling/Swift` folder.
2. Run `make`
3. Run `./server` to start the server
Alternative method: Open WebRTC-Demo.xcworkspace and run the SignalingServer scheme.
Run instructions
Run the app on two devices with the signaling server running.
Make sure both of the devices are connected to the signaling server.
On the first device, click on ‘Send offer’ – this will generate a local offer SDP and send it to the other client using the signaling server.
Wait until the second device receives the offer from the first device (you should see that a remote SDP has arrived).
Click on ‘Send answer’ on the second device.
when the answer arrives to the first device, both of the devices should be now connected to each other using webRTC, try to talk or click on the ‘video’ button to start capturing video.
To restart the process, kill both apps and repeat steps 1-6.
CallKit integration
Disclaimer: I am not sure if this is the best way doing it but this has worked for me so far:
Configure WebRTC audio session to use manual audio and disable audio:
On your CXProvider delegate’s provider(CXProvider, didDeactivate: AVAudioSession) call RTCAudioSession.sharedInstance().audioSessionDidDeactivate with the AVAudioSession from the CXProvider
Building a startup that is focused exclusively on data science projects in two hypergrowth industries, blockchain, and artificial intelligence is truly exciting and game-changing. The reality is Malastare is a hypergrowth startup and it just isn’t for everyone. Unapologetically, we work hard, run hard, keep bureaucracy to a minimum and hold ourselves accountable in our quest to build something special. If these things interest you, you are in the right place.
We are a team of product visionaries, talented engineers, data scientists, and customer-obsessed inventors who tackle the world’s most complex deep learning, artificial intelligence challenges in order to deliver best-in-class infrastructure and software solutions.
Our cutting-edge engineers and data scientists create disruptive real-world applications to realize the promise of nascent blockchain and AI technologies and provide highly secure and feature-rich solutions for our customers. We leverage the most advanced deep learning neural networks, based on best-in-class sentiment analysis and market analytics.
We are a startup with a strong impetus to innovate, drive end to end ownership and meet critical business goals. You get to rub shoulders daily with outstanding software, hardware and embedded engineers, data scientists, UX designers and the executive leadership team in an environment of high-speed learning and professional development. Our employees thrive in a unique team environment where energy, creativity, and collaboration drive innovation.
Our expertise covers the following:
Business Logistics, Including Supply Chain Optimization
Supply chain plays an important role in tracking the goods and services that a company manufactures. This asset of the company was initially undertaken with the help of management tools until the advent of analytics. Analytics uses the historical enterprise data to train predictive models in machine learning that make informed business decisions. It enables one to identify inefficiencies to capture greater cost savings. Sometimes, risk modeling is conducted to do a “pre-mortem” for future threats. Analytics are also useful in identifying the key factors that enable better functioning of supply chain management.
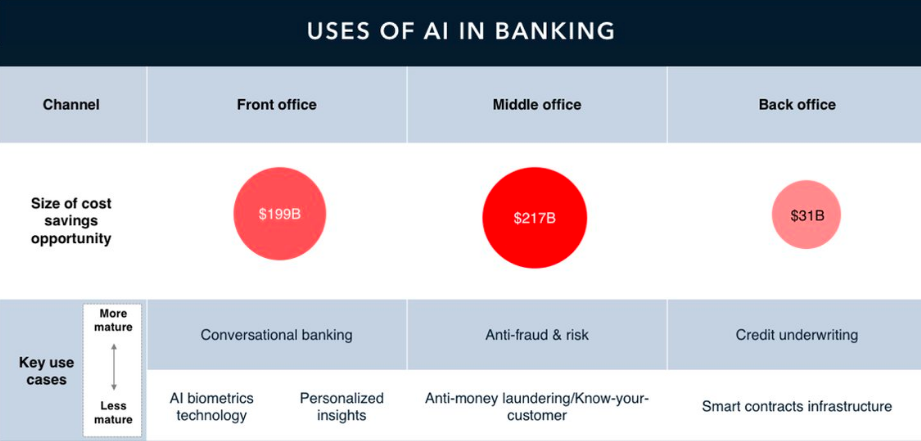
FinTech Industries
After the recession in 2008 hit the financial sector and left everyone panting for more, the importance of Big Data in finance was realized. The BFSI (Banking and Finance Services Industry) came up with many sorts of data and along with many sorts of problems which were only possible to solve with the help of big data.
The three Vs of big data – velocity,volume and variety have accelerated the banking sector in various aspects. In investment banking, the volume of data is growing manifold day-by-day and so has its velocity. Cloud computing and Hadoop have enabled the big data platforms to cater to the tremendous volume of data. Banks have now realized the potential of big data and are employing the same in their systems to make it future-proof.
Health And Wellness
The evolution of the healthcare domain was only observed after big healthcare organizations started investing in big data. The amount at which the data was flowing in, made it difficult for the traditional data-processing application software to cope with the data. Big data has tools like Hadoop, MapReduce, Hive, Pig which help in proper management of big volumes of data as well as in processing it for the welfare of the domain. At times, cancer is untraceable in a human body which leads to late detection or no detection at all. Big data helps in solving that problem.
Patients need their body-metrics tracked every time which involves everything from heartbeat to sugar levels. Big data takes care of that too.
Education And Electronic Teaching
Online teaching and education are taking the market by storm as it is been adopted by more and more organizations. Online courses which can be accessed from anywhere are being recommended. The recommender system in data science is implemented for this purpose and assigns courses as per one`s interests.
Climate And Energy
Weather forecasting is the most common application and it has been operating for quite a long time. Predicting any weather changes like storms, thunder, heavy rainfall makes it easy for forecasters to analyze and understand the future scenario much better. Issues like carbon emissions and hike in the level of the sea due to glaciers, environmental changes, and ecological disbalances can be calculated before its advent have any catastrophic effects on nature and human lives.
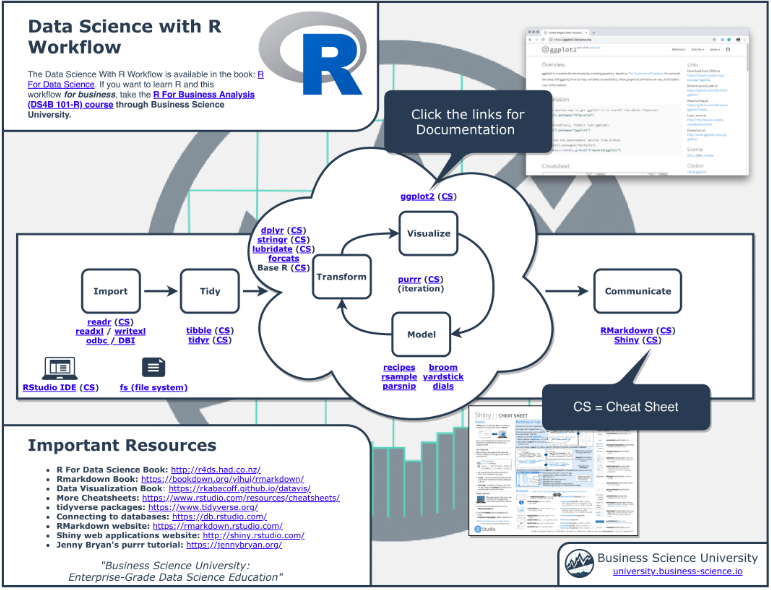
Data Processing Overview
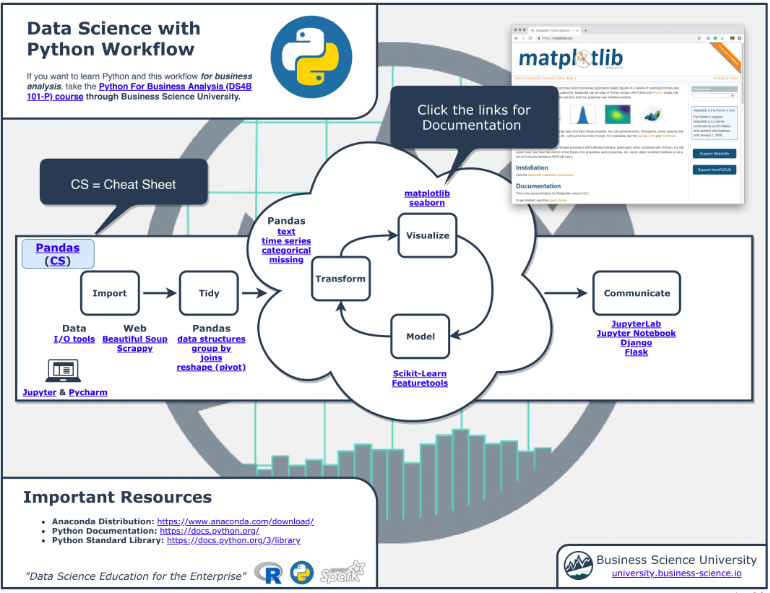
Python Workflow
To carry out data cleansing, data transformation, statistical modeling, data visualization, machine learning, and countless more.
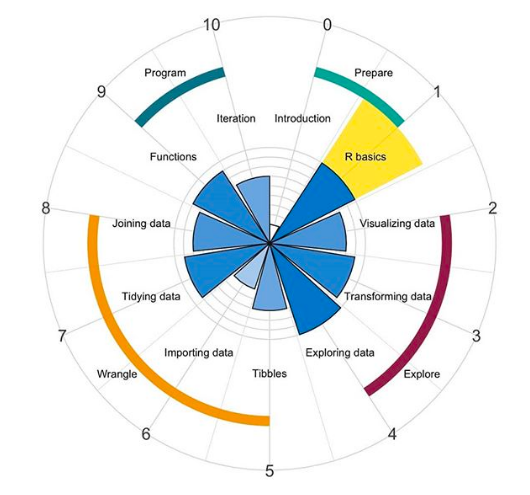
RStudio Workflow
To perform operations on data.
R takes care of visualization by providing a shiny tool. RShiny takes care of interactive web applications for visualizing data which brings data analysis in R to life.
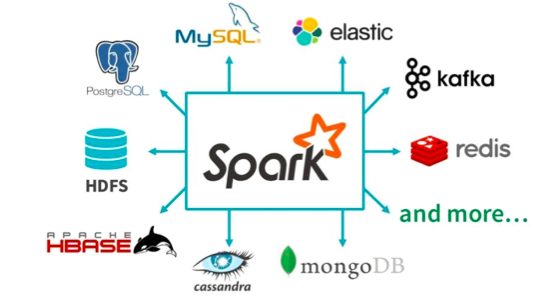
Apache Spark
Used to execute projects in Scala, Java, SQL, Python, or R. Considered as a unified engine which is used to take analytical decisions from large-scale data processing.
For managing clusters, Spark provides standalone Hadoop YARN.
For distributed storage, Spark offers an interface with a wide variety of applications like Hadoop Distributed File System, MapReduce File System, Cassandra.
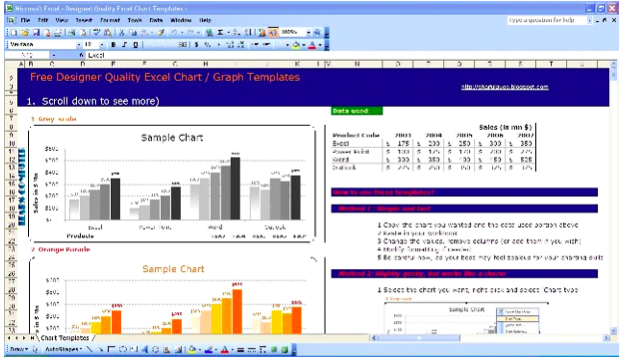
Microsoft Excel
To carry out calculations, visualize graphs.
SQL
SQL programming language used to handle and manipulate structured queries stored in relational database systems also know as RDBMS.
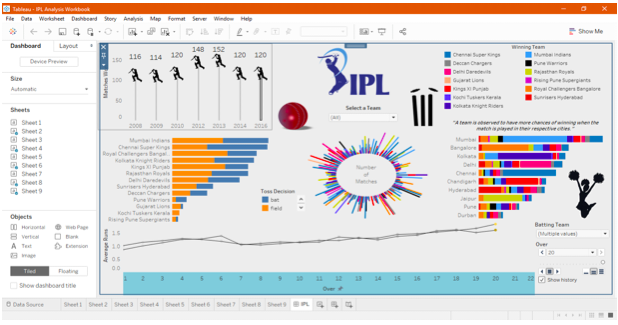
Tableau
Tableau data visualization tool used for representing data in terms of charts and dashboards open and generate useful insights for clients. Its capability to handle relational databases, OLAP cubes, spreadsheets and also generate a number of graph types depending on the type of data retrieved. The latitude and longitudes features of a location offered in Tableau creates a geographic representation of any reports regarding sales, profit or any other factors which can be represented with the help of maps.
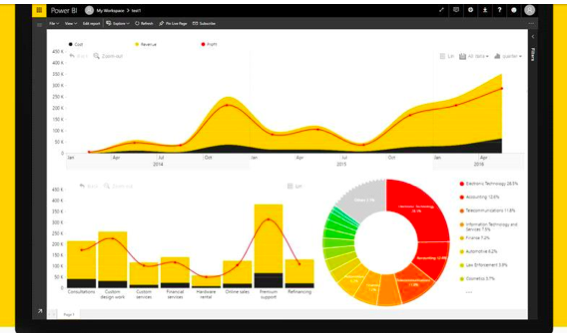
Power BI
Power BI as a business intelligence tool developed by Microsoft. It provides interactive visualizations coupled with BI capabilities, where we build our own customized reports and dashboards, without having to depend on information technology users or database administrators.
Its cloud-based BI services enables connecting to hundreds of data sources in the cloud, using power query to simplify data ingestion, transformation, integration, and enrichment.
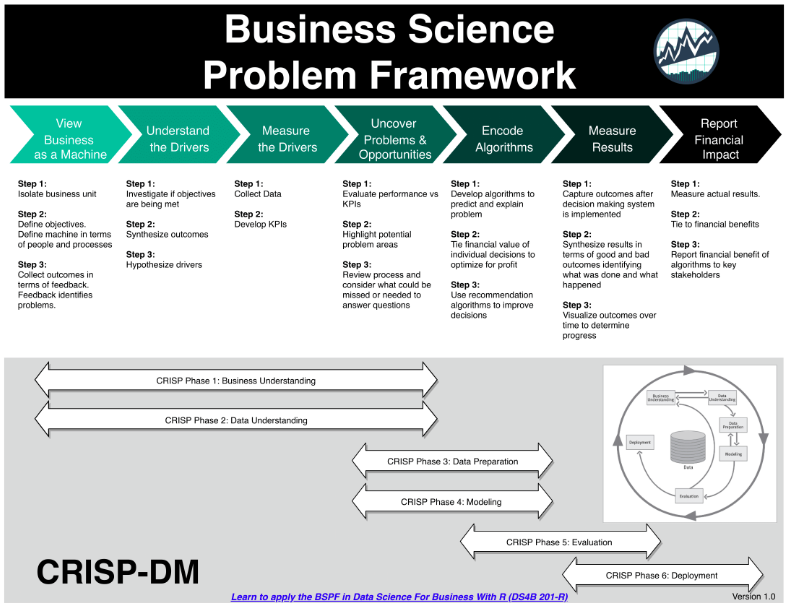
Our Problem Solving Roadmap
License
These project are licensed under the MIT License – see the LICENSE.md file for details