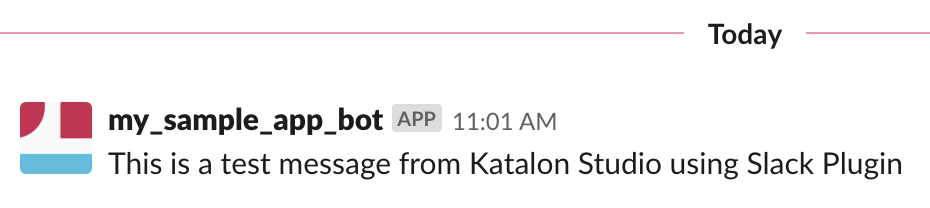
Click the Test Connection to check your credentials. If everything is OK, a message should be sent to Slack.
Click the Apply button then OK to close the Project Settings dialog.
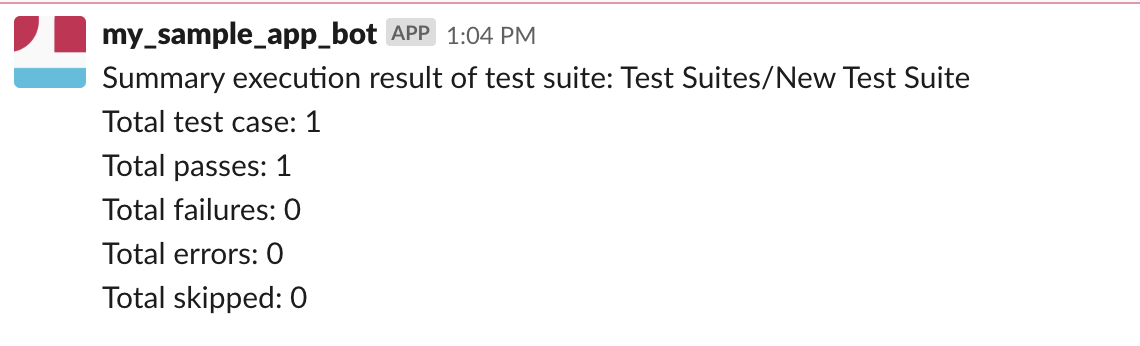
Run test execution
Execute a test suite and wait for the execution finished, a summary message should be sent to your Slack channel.
Companion products
Katalon TestOps
Katalon TestOps is a web-based application that provides dynamic perspectives and an insightful look at your automation testing data. You can leverage your automation testing data by transforming and visualizing your data; analyzing test results; seamlessly integrating with such tools as Katalon Studio and Jira; maximizing the testing capacity with remote execution.
Katalon Studio is a free and complete automation testing solution for Web, Mobile, and API testing with modern methodologies (Data-Driven Testing, TDD/BDD, Page Object Model, etc.) as well as advanced integration (JIRA, qTest, Slack, CI, Katalon TestOps, etc.). Learn more about Katalon Studio features.
Quickly build and design new UI without writing css.
Version 5.0.0.alpha
Principles
Everything should be 100% responsive
Everything should be readable on any device
Everything should be as fast as possible
Designing in the browser should be easy
It should be easy to change any interface or part of an interface without breaking any existing interfaces
Doing one thing extremely well promotes reusability and reduces repetition
Documentation helps promote reusability and shared knowledge
Css shouldn’t impede accessibility or the default functionality of Html
You should send the smallest possible amount of code to the user
Features
Mobile-first css architecture
8px baseline grid
Multiple debugging utilities to reduce layout struggles
Single-purpose class structure
Optimized for maximum gzip compression
Lightweight
Usable across projects
Growing open source component library
Works well with plain html, react, ember, angular, rails, and more
Infinitely nestable responsive grid system
Works out of the box but easy to customize and extend
Verbose?
The main difference between Tachyons and Tachyons Verbose is the latter spells out all of its classes. So instead of dib, we will spell it out as display-inlineblock. Our naming conventions stay close to the original CSS properties so that you don’t have to remember an extra acronym or naming convention. As a bonus, if your memory is rusty about CSS property names and values, using Tachyons Verbose will help you remember that too. In short, it’s functional CSS with the lightest cognitive load possible, and the only downside is that the code initially looks “ugly” because there are a lot of words in the class declaration.
Verbose class naming conventions
Tachyons Verbose classes use an unambiguous naming formula:
.propertyname-value-mediaquerysize
As you can see, hyphens are only used to separate the properties from their values, or to add on a conditional media query. For example:
.textalign-center maps to { text-align: center; }
.position-absolute maps to { position: absolute; }
Media queries are labeled as mediaS, mediaM, mediaL or mediaXL for small, medium and large screen sizes. In the future, we will support container queries as well, which is why we decided there was need to clarify these are for @media queries. So:
.textalign-center-mediaS maps to { text-align: center; } when the screen size is 30em or more. You can set what the media query breakpoints are at in src/_media-queries.css.
Because CSS class names don’t support most symbols and punctuation marks, we had to make our workarounds for certain values. For example:
.width-100percent maps to { width: 100%; }
.lineheight-1p5 maps to { line-height: 1.5; } as in “one point five”
.margin-minus2 maps to { margin: calc(-1 * var(--spacing-2)); } where “minus” also means negative
As you can see, some of our class names use double dash -- variables that you can adjust in src/_variables.css.
Tachyons Verbose specific implementation
This release of Tachyons Verbose is a verbose fork of the Tachyons v5.0.0.beta. Aside from different naming conventions, we also made a few additions:
If specific values are referenced in size scale, you can refer to both as a part of the scale and as the literal value. E.g. 1backgroundsize-3 and .backgroundsize-16px both map to { background-size: 16px; }.
In parallel to the numerical size scales, we also use small, medium ad large for heights, widths, margins and paddings. In this scheme, padding-medium gives 1 rem of padding. To increase the size use large, xlarge, xxlarge, xxxlarge, etc. To decrease use small, xsmall, xxsmall, xxxsmall, etc.
Tachyons v5.0.0.beta replaces all media queries with container queries. Tachyons Verbose hasn’t changed over yet because a) container query support is still relatively new, and b) we haven’t been able to use dynamic variables for container query breakpoints yet.
What to know if you’re an existing user of Tachyons Verbose (v4 from 2018)
Most of the stuff is still the same! Don’t fret about having to learn a completely new thing.
You can now adjust scales, sizes and colors in src/_variables.css.
The font scale (f1 or fontsize-2) runs linearly with 1 being the smallest and 12 being the biggest.
The colors have new names. E.g. backgroundcolor-red is no longer a class, but you get a whole spectrum from backgroundcolor-red1 to backgroundcolor-red11.
Media queries are no longer referenced with a simple -m or l suffix. They are now referenced as -mediaM and mediaL. Oh and -ns is now -mediaS.
But hey, there’s a new media query size at mediaXL.
The legacy v4 files are the css folder in case previous users want to reference them or want to link to both the legacy and new versions at the same time for a more gradual transition.
We renamed our CSS files to tachyons-verbose.css.
Getting Started
Local setup
Download the repo from github and install dependencies through npm.
cd tachyons-verbose
npm install
Dev
If you want to just use everything in tachyons/src as a jumping off point and edit all the code yourself, you can compile all of your wonderful changes by running
npm start
This will output both minified and unminified versions of the css to the css directory and watch the src directory for changes. It’s aliased to the command:
If you want to recompile everything from src everytime you save a change – you can run the following command, which will compile and minify the css
npm run build:watch
If you’d like to just build the css once without watching the src directory run
npm run build
If you want to check that a class hasn’t been redefined or ‘mutated’ there is a linter to check that all of the classes have only been defined once. This can be useful if you are using another library or have written some of your own css and want to make sure there are no naming collisions. To do this run the command
This is a place where I will post python code used to do various tasks associated with archival work. While I recognize that there are many others out there
contributing similar content, I think it’s helpful to have a multitude of scripts to work with. Additionally, I will try to explain each bit of code
within the script itself, but I will provide a written tutorial via blog posts over on my blog. I feel that I can provide more extensive instruction in a blog post than in the script itself.
However, with recent social and political unrest in the aftermath of the murder of George Floyd, I felt an increasing need to do something, anything to make a concrete change in our unjust world. Thus, I began looking for ways to use this new skill to address some of the concerns and issues we (as in those in the archive as a collective) face with the records we care for. Particularly in the language, we use (or those in the past have used) to describe certain communities and individuals. This has been an ongoing conversation, started long before the events of summer 2020, but sadly, it has taken me some time to realize how crucial this work is. So, in an attempt to join in the labor of many other information management specialists, I have decided not only to try and use python to find, and correct some of the failures in the archival description practice, but to also provide those scripts via Github. My hope is that by making these widely available, they can be used to create broader change.
With all that being said, I must also point out that the scripts shared here will not all be associated with this type of social justice work. Some will simply be straight forward and meant to help archivists and information specialists in their day to day tasks.
A Note to Those Using/Reviewing the Scripts
I am providing this information via Github in the hopes that it will be accessed by a wide variety of individuals, but also, in hopes of making my own scripts better. I am, and there is no shame when I say this as we all start somewhere, a python novice. I do not claim to speak “pythonic,” although I would love to be able to say so one day. The beauty of Github is that it acts very similarly to an archival repository. Any changes can be made while maintaining older versions. So, if you have a way to improve these scripts, I implore you to submit a ‘commit’ and ‘pull request.’ Selfishly, this will make the script better when I use it in the future, but for others, this will ensure they are using a collectively developed tool.
Navigating the Files
To make things easier, I have provided all files related to archival redescription work in a folder titled Legacy_Description_Audit. Here you will find the python scripts created and used in the audit, as well as working files created to organize and record data associated with the project.
I have also included other directories for scripts used in my everyday work as an archivist. Many of these focus on manipultaing EAD or MODS data, or using the ArchivesSpace API for data manipulation/clean-up.
YOLOv8 Video Object Detection with K-Means Clustering for Dominant Color Extraction
Overview
This project implements a Flask-based web application that leverages YOLOv8 for video object detection and K-Means clustering to extract the most dominant color from detected objects. The application is tailored for scenarios such as analyzing smoke emission levels from vehicles, determining the potential risk based on the smoke’s color, and providing intuitive visualizations and results in real time.
Features
Object Detection: Utilizes YOLOv8 for detecting objects in uploaded videos.
Color Analysis: Applies K-Means clustering to extract dominant colors from detected regions.
Danger Level Assessment: Associates detected colors with predefined danger levels and provides descriptive insights.
CSV Export: Saves results (colors, danger levels, and descriptions) into a CSV file.
Video Processing: Generates annotated videos with bounding boxes and labels for detected objects.
Web Interface: User-friendly interface for uploading videos and viewing results.
Prerequisites
Before setting up the project, ensure the following dependencies and tools are available:
Python 3.8+
Flask
Flask-SocketIO
OpenCV
Scikit-learn
Webcolors
Ultralytics YOLOv8
Ensure you have YOLOv8 model weights (best.pt) in the model/weights/ directory.
Installation
Clone the Repository:
git clone https://github.com/your-repo/yolov8-dominant-color.git
cd yolov8-dominant-color
Set Up a Virtual Environment:
python -m venv venv
source venv/bin/activate  # On Windows: venv\Scripts\activate
Install Dependencies:
pip install -r requirements.txt
Prepare Directories:
Ensure the following directories exist:
DominantColors/
uploaded_video/
processed_videos/
model/weights/ (place your YOLOv8 weights here)
Usage
Run the Flask App:
python app.py
Upload a Video:
Navigate to http://127.0.0.1:5000 in your web browser.
Upload a video file for processing.
View Results:
Processed videos will be available in the processed_videos/ directory.
Download the CSV report for dominant colors and danger level analysis.
How It Works
Video Upload:
The user uploads a video through the Flask web interface.
Object Detection:
YOLOv8 detects objects such as smoke and vehicles.
Bounding boxes are drawn, and detected objects are saved as images.
Color Extraction:
For detected smoke regions, K-Means clustering identifies the most dominant color.
The closest color name is determined using the Webcolors library.
Danger Level Assessment:
The dominant color is mapped to a predefined danger level (e.g., “None,” “Medium,” “High”).
Descriptions provide insights into the cause (e.g., “Coolant being burned”).
Visualization and Output:
Processed videos are annotated and saved.
Results are compiled into a CSV file, including color names, danger levels, and descriptions.
Result Display:
Results (video, dominant colors, and analysis) are shown on the web interface.
Dataset Information
This project uses a labeled dataset of vehicles and smoke from Roboflow.
Contributors
This project was a collaborative effort:
James Daquioag (Project Head/Engineer): Led the project, designed the architecture, and implemented YOLOv8 integration.
Gerald Serrano (Developer/Tester): Assisted with coding and application testing.
Lance Kim Formales (Tester/Documentation): Focused on testing and preparing documentation.
License
This project is licensed under the terms specified in the LICENSE file.
Contribution
Contributions are welcome! Feel free to submit issues or pull requests to improve this project.
Screeps Typescript Starter is a starting point for a Screeps AI written in Typescript. It provides everything you need to start writing your AI whilst leaving main.ts as empty as possible.
Build tools (apt install build-essential for Ubuntu, Visual Studio for Windows, etc)
Download the latest source here and extract it to a folder.
Open the folder in your terminal and run your package manager to install install the required packages and TypeScript declaration files:
# yarn
yarn
Fire up your preferred editor with typescript installed and you are good to go!
Rollup and code upload
Screeps Typescript Starter uses rollup to compile your typescript and upload it to a screeps server.
Move or copy screeps.sample.json to screeps.json and edit it, changing the credentials and optionally adding or removing some of the destinations.
Running rollup -c will compile your code and do a “dry run”, preparing the code for upload but not actually pushing it. Running rollup -c --environment DEST:main will compile your code, and then upload it to a screeps server using the main config from screeps.json.
You can use -cw instead of -c to automatically re-run when your source code changes – for example, rollup -cw --environment DEST:main will automatically upload your code to the main configuration every time your code is changed.
Finally, there are also NPM scripts that serve as aliases for these commands in package.json for IDE integration. Running yarn run push-main is equivalent to rollup -c --environment DEST:main, and yarn run watch-sim is equivalent to rollup -cw --dest sim.
Important! To upload code to a private server, you must have screepsmod-auth installed and configured!
Typings
The type definitions for Screeps come from typed-screeps. If you find a problem or have a suggestion, please open an issue there.
Documentation
We’ve also spent some time reworking the documentation from the ground-up, which is now generated through Gitbooks. Includes all the essentials to get you up and running with Screeps AI development in TypeScript, as well as various other tips and tricks to further improve your development workflow.
Maintaining the docs will also become a more community-focused effort, which means you too, can take part in improving the docs for this starter kit.
yarn build – Builds the package, emitting .js and .d.ts files yarn lint – Runs lint over the project source yarn test – Runs all tests under the src/ directory yarn publish – Bumps package version and publishes the package to Github Packages
We believe in a future in which the web is a preferred environment for numerical computation. To help realize this future, we’ve built stdlib. stdlib is a standard library, with an emphasis on numerical and scientific computation, written in JavaScript (and C) for execution in browsers and in Node.js.
The library is fully decomposable, being architected in such a way that you can swap out and mix and match APIs and functionality to cater to your exact preferences and use cases.
When you use stdlib, you can be absolutely certain that you are using the most thorough, rigorous, well-written, studied, documented, tested, measured, and high-quality code out there.
To join us in bringing numerical computing to the web, get started by checking us out on GitHub, and please consider financially supporting stdlib. We greatly appreciate your continued support!
snanmeanpn
Calculate the arithmetic mean of a single-precision floating-point strided array, ignoring NaN values and using a two-pass error correction algorithm.
The branches.md file summarizes the available branches and displays a diagram illustrating their relationships.
To view installation and usage instructions specific to each branch build, be sure to explicitly navigate to the respective README files on each branch, as linked to above.
The N and stride parameters determine which elements in the strided array are accessed at runtime. For example, to compute the arithmetic mean of every other element in x,
Note that indexing is relative to the first index. To introduce an offset, use typed array views.
varFloat32Array=require('@stdlib/array-float32');varx0=newFloat32Array([2.0,1.0,2.0,-2.0,-2.0,2.0,3.0,4.0,NaN,NaN]);varx1=newFloat32Array(x0.buffer,x0.BYTES_PER_ELEMENT*1);// start at 2nd elementvarv=snanmeanpn(5,x1,2);// returns 1.25
snanmeanpn.ndarray( N, x, strideX, offsetX )
Computes the arithmetic mean of a single-precision floating-point strided array, ignoring NaN values and using a two-pass error correction algorithm and alternative indexing semantics.
The function has the following additional parameters:
offsetX: starting index for x.
While typed array views mandate a view offset based on the underlying buffer, the offset parameter supports indexing semantics based on a starting index. For example, to calculate the arithmetic mean for every other element in x starting from the second element
stdlib_strided_snanmeanpn_ndarray( N, *X, strideX, offsetX )
Computes the arithmetic mean of a single-precision floating-point strided array, ignoring NaN values and using a two-pass error correction algorithm and alternative indexing semantics.
#include"stdlib/stats/base/snanmeanpn.h"#include<stdio.h>intmain( void ) {
// Create a strided array:constfloatx[] = { 1.0f, 2.0f, 0.0f/0.0f, 3.0f, 0.0f/0.0f, 4.0f, 5.0f, 6.0f, 0.0f/0.0f, 7.0f, 8.0f, 0.0f/0.0f };
// Specify the number of elements:constintN=6;
// Specify the stride length:constintstrideX=2;
// Compute the arithmetic mean:floatv=stdlib_strided_snanmeanpn( N, x, strideX );
// Print the result:printf( "mean: %f\n", v );
}
References
Neely, Peter M. 1966. “Comparison of Several Algorithms for Computation of Means, Standard Deviations and Correlation Coefficients.” Communications of the ACM 9 (7). Association for Computing Machinery: 496–99. doi:10.1145/365719.365958.
Schubert, Erich, and Michael Gertz. 2018. “Numerically Stable Parallel Computation of (Co-)Variance.” In Proceedings of the 30th International Conference on Scientific and Statistical Database Management. New York, NY, USA: Association for Computing Machinery. doi:10.1145/3221269.3223036.
See Also
@stdlib/stats-strided/dnanmeanpn: calculate the arithmetic mean of a double-precision floating-point strided array, ignoring NaN values and using a two-pass error correction algorithm.
@stdlib/stats-base/nanmeanpn: calculate the arithmetic mean of a strided array, ignoring NaN values and using a two-pass error correction algorithm.
@stdlib/stats-base/smeanpn: calculate the arithmetic mean of a single-precision floating-point strided array using a two-pass error correction algorithm.
@stdlib/stats-base/snanmean: calculate the arithmetic mean of a single-precision floating-point strided array, ignoring NaN values.
Notice
This package is part of stdlib, a standard library for JavaScript and Node.js, with an emphasis on numerical and scientific computing. The library provides a collection of robust, high performance libraries for mathematics, statistics, streams, utilities, and more.
For more information on the project, filing bug reports and feature requests, and guidance on how to develop stdlib, see the main project repository.
Objects in Objective-C have properties and methods. Properties should be accessed via dot syntax and methods should be called via square brackets.
Note: with every OS X release Apple updates API of its frameworks. Many things that were previously declared as a setter and getter methods gradually transition to a property declarations. Your source code should reflect these changes as they happen.
Symbols prefixes
All classes, functions, enumerations and global constants (numbers, strings, notifications and so on…) should be prefixed with a three letters.
Hint: for personal projects and reusable components consider using abbreviation of your name, middle name and a last name. When working for a client stick with abbreviation of a project name. Just make sure you pick one that sounds good.
Use Interface Builder when making UI
Views created and configured in code are understandable only to their authors. And only within the first two weeks after a commit. Utilize Interface Builder. Finally, the Auto Layout support is so good you no longer have to fight with the tool.
Hierarchical structure of a project files
For every separate object (class) in a project an Xcode group (yellow one) should be created. These groups should be named after the corresponding objects minus the mandatory three-letter prefix.
On OS X you generally work with two types of nibs: view nibs and window nibs.
Imagine you have a view controller named ASDMessagesViewController. Its corresponding view nib should be named ASDMessagesView, dropping the ‘Controller’
part.
Imagine you have a window controller named ASDMainWindowController. Its corresponding window nib should be named ASDMainWindow, dropping the ‘Controller’
part.
Prefer an old-school nibs to storyboards
When building a complex application stick with an old-fashioned nib-based approach for building UI. It’s much better to keep things separated and manageable than to put everything in one place.
Take advantage of a Base Internationalization feature
When you need to localize static UI strings prefer to use Base Internationalization feature. Under no circumstances should you multiply the nib-files under different lproj-subdirectories! Base Internationalization approach is DRY. It also liberates you from the need to invent custom localized strings keys and makes manual strings injection unnecessary.
Extensive usage of a const qualifier
Every ‘variable’ that is not intended to be altered down the control flow should be declared as constant. It is much easier to reason about the algorithm when there are things that doesn’t change under your very nose.
// Magic numbers should be const.constNSUInteger magicNumber = 42;
// Notifications should be const.NSString* const KSPUsefulNotification = @"KSPUsefulNotification";
// Any objects handles should be const.NSImage* const image = [NSImageimageNamed:@"NSActionTemplate"];
// Intermediate state calculations should be const.constBOOL canMarkChatAsUnread = (clickedChatOrNil && [selfcanMarkChatAsUnread: clickedChatOrNil]);
// Parameters should be const.
[RACObserve(self, something) subscribeNext: ^(idconst something)
{
// ...
}];
Const all the things!
Take advantage of a static typing
Everything that may be typed should be typed.
For every NSViewController subclass that you have you should re-declare its representedObject property type from id to some meaningful represented object class. Don’t forget to add a @dynamic representedObject; to the implementation file.
For every NSTableCellView subclass that you have you should re-declare its objectValue property type from id to some meaningful object value class. Don’t forget to add a @dynamic objectValue; to the implementation file.
Property definitions should be explicit
All property definitions should include all possible property attributes.
Note: a new nullable and nonnull attributes should be added (to the end of the list) where it makes sense. See the NS_ASSUME_NONNULL_BEGIN/NS_ASSUME_NONNULL_END macro.
Explicit is much better than implicit when it comes to property semantics.
Check invariants with NSAssert macros
When your methods have required parameters you should always check their presence via NSParameterAssert(...); macro. These checks should be the first thing you do in a method body.
Hint: for C functions use an NSCParameterAssert(...) macro.
When you write code you make numerous assumptions about the state of a surrounding system. Sometimes your assumptions are wrong. It’s a good practice to fix your assumptions in code in a way of NSAsserts so you can get meaningful exceptions when your code breaks.
#pragma mark - Initialization

// Various initializers go here.

#pragma mark - Cleanup

// The sole -dealloc method here.

#pragma mark - SuperClass Overrides

// Superclass method overrides go here.

#pragma mark - Reactivity

// Bindings and declarative logic of a ReactiveCocoa goes here.

#pragma mark -

// The sole -awakeFromNib goes here.

#pragma mark - Interface Callbacks

// IBActions from UI go here.

#pragma mark - Lazy Initialization

// Getters that perform a lazy objects initialization go here.

#pragma mark - Public Methods

// Public methods go here.

#pragma mark - Private Methods

// Private methods go here. Class can have a numerous 'Private Methods' sections, in which case they should be named like 'Private Methods | Group Name' and so on...

#pragma mark - InformalProtocol Informal Protocol Implementation

// Informal protocol implementation goes here.

#pragma mark - SomeProtocol Protocol Implementation

// Protocol implementation goes here.

#pragma mark - Localization

// Sometimes there is a need to inject localized strings in a dynamic way.
All views should be laid out via Auto Layout
Since the Auto Layout introduction in OS X Lion (in 2011) I have not written a single -setFrame: call and never set an autoresizing mask. And so should you.
When you initialize a view in code, pass NSZeroRect as a parameter to -initWithFrame: method:
Class files: public header, class extension and implementation
For a class called MyClass these files should be named correspondingly: MyClass.h, MyClass+Private.h and MyClass.m.
Public header should contain only public API of the class. Every implementation detail that needs to be declared in a header should go to a class extension (readwrite property redefines, private methods declarations that are subject for override in a subclass and so on…). When making a subclass remember that you need to import a class extension (MyClass+Private.h), not a public header.
Poor man’s optionals: objectOrNil
Untill the recent introduction of a nullability annotations it always was non-obvious whether you can get a nil instead of a meaningful object from some method (after looking at its signature in a header). The only way determine it was to read the docs.
Note: there is a prevailing opinion that nils are dangerous. They were even considered a billion dollar mistake.
Until nullability annotations were added to the Objective-C I had a naming convention that allowed me not to neglect the fact I can get a nil reference at some point.
Code is written once, but read and edited multiple times, possibly even by someone of your co-workers. When you write it in a first place you check the docs and examine all possible return values from a method. When time passes and you return to a code to make improvements it is very easy to miss the important details.
Even with nullability annotations it is still a good idea to follow this naming convention. Some may say it is too verbose and to some extent resembles an ugly hungarian notation, but I prefer explicit and obvious when it comes to dealing with nils.
Instance variables should begin with an underscore _
It is very important to be able to distinguish between a local variables and an instance variables on a visual level. There are at least two unpleasand memory-management problems that may happen because of inattention.
Problem #1: when you access an ivar in a block, compiler involves an implicit self, retaining the latter.
@implementationClassName
{
id _instanceVariable;
}
- (void) setupReactivity
{
@weakify(self);
// A long-living observer block.
[RACObserve(self, someProperty) subscribeNext: ^(id someProperty)
{
@strongify(self);
// We've made a weakify/strongify dance and may think that everything is ok.// ...but this statement actually references an implicit self that leads to a retain cycle.
_instanceVariable = ...;
// That's why every instance variable should be accessed via an explicit weakified self:
self->_instanceVariable = ...;
}];
}
Problem #2: you will crash if you attempt to dereference a nilled self
// Make a weak self.
@weakify(self);
// Imagine a long-living block.
^()
{
// Make a local strong self.
@strongify(self);
// Check whether or not we got it.if(!self) return;
// Here and to the end of a block we have a valid strong self reference.
self->_instanceVariable = ...;
}
Designated initializers of a class should be annotated with an NS_DESIGNATED_INITIALIZER macro.
This way the compiler will take the responsibility for maintaining the interrelation of a designated and convenience initializers. It also will check the chaining with a designated initializer of a superclass.
Mark relevant methods with an NS_REQUIRES_SUPER macro
When you design a class and assume that some of its methods may be a subject for an override in a subclass consider marking them with an NS_REQUIRES_SUPER macro if you want your original implementations to be called.
A wrapper around Axios that will improve the performance of your isomorphic websites by pushing API responses to the client.
About isomorphic websites:
Isomorphic websites run on both the server and client, doing much of the initial work on the server side so the user doesn’t have to wait for multiple request/response round-trips.
By running client-side code on the server first, we can find out exactly what API requests the client will make, and make those requests on the server first.
About server push:
When serving a webpage over HTTP/2, the server can also promise to send other related files (like css, js, images, or even api calls), so the client doesn’t have to request them. More info
Installation
npm i --save axios-push
Usage
import prepareAxios from 'axios-push';
Call it just before server-side rendering. The function takes two arguments:
axiosInit – (Optional) Either an Axios instance, or an Axios config object.
It returns an instance of Axios. Use it in place of axios.create() on the server side.
Basic usage
Any API calls you make using axios-push are pushed to the client.
On the server side, all Axios functions return a promise that never resolves. This allows you to write your code as if it were client-side only.
axios.get('/foo').then(response=>{/* this block only runs on the client side */});
Chained API calls
If you want to chain API calls on the server side, add chained: true to the request config:
axios.get('/foo',{chained: true}).then(response=>axios.get(`/bar?fooId=${response.data.id}`)).then(response=>{/* this block only runs on the client side */});
You’ll have to keep the page’s response stream open a bit longer for chaining to work.
This is just one example. You could also place the axios instance in React context instead.
Use in the browser
When bundled by webpack for use in a browser, prepareAxios() simply calls axios.create() and returns the instance.
Use in Next.js
You can use this in Next.js’sgetInitialProps({ req, res }) function to create a wrapped axios instance for the page. In componentWillMount, make your api calls with the resulting axios instance if it exists, or create a new instance if it doesn’t.
If using next-redux-wrapper, you can create the axios instance in your makeStore(initialState, { req, res }) callback function.
Advantages
Other solutions, such as redux-connect or react-resolver, delay the whole page response until all the API calls have been made. Server push has a few advantages over that:
The browser receives HTML sooner and can begin fetching static content from a CDN immediately (if you’re not also pushing that).
It provides a better user experience by displaying some content, even if just a loading icon, as soon as possible.
Greater flexibility of where in your code you make your API calls. This can result in cleaner code, and it’s easier to add this library to existing code.
Caveats
While browsers do accept push promises of static resources on other domains, no major browser currently accepts push promises for API endpoints on a different domain.
The http2 spec does allow for this, however, so long as both domains use the same security certificate. Hopefully browser behavior will soon change to match the spec.
What this means:
If your website is at www.example.com, today’s browsers won’t accept push promises for api.example.com.
The simple workaround:
Simply use www.example.com/api.
If your api is at api.example.com, forward requests from www.example.com/api/<stuff> to api.example.com/<stuff>. (Do this on the server side, NOT by using 3xx redirects.)
Notes
If you add a request interceptor, it may break something. Instead, consider using axios instance defaults for things like auth headers.
To test this on localhost, you may have to set process.env.NODE_TLS_REJECT_UNAUTHORIZED = "0" so node will connect to your own local server via TLS. DO NOT DO THIS IN PRODUCTION.
This works with Node.js v8.8.0 or greater, or Node.js v8.5.0 with the --enable-http2 flag.
Delphi: Creación de ficheros normas 19.14 y 34.14 SEPA formato XML
Actualización 2024: Compilado sin problemas en Delphi Alexandria. Corregido un bug en la conversión de importes a texto. No se estaba aplicando el formato formatSettings (ver el commit) lo cual resultaba que en proyectos que tuvieran decimalseparator = ‘,’; los importes quedasen con ‘,’ y fallaban.
Actualización 2019: Mucha gente me pregunta si este proyecto sigue siendo válido, tras ver que lleva años sin actualizarse. Sí, yo sigo utilizandolo en proyectos que generan ficheros SEPA a diario. Simplemente es que la normativa no ha cambiado, y no ha sido necesario actualizarlos. Con respecto a utilizarlo en las versiones más nuevas de Delphi, no debes tener problema, no se utilizan features del lenguaje novedosas.
Estas unidades contienen dos objetos para la creación de los siguientes ficheros:
Norma 19.14 SEPA XML. Es un fichero de órdenes de cobro. El ordenante cobra al deudor. Internamente tenemos un array de ordenantes, cada uno con sus órdenes de cobro. Basta utilizar AddOrdenante, AddCobro. Como cada ordenante tiene una cuenta de abono para todos los cobros, internamente el objeto se encarga de colocar cada cobro en su ordenante. Ver el test está ahí explicado el uso de los objetos.
Norma 34.14 SEPA XML. Es un fichero de órdenes de pago. El ordenante paga al beneficiario.
Cosas a tener en cuenta:
Leer la normativa de los dos ficheros. Son complejos. Hay campos opcionales que no se han añadido aquí y puede que su banco se lo pida. Los identificadores únicos de cada elemento son importantes, hay que leer su significado y tomar la decisión de cómo formarlos. Por si fuera poco, cada banco tiene su interpretación y puede que le pida alguna variación en algún elemento del fichero (esto ya lo he comprobado con la versión anterior los 19.14 y 34.14 en formato plano). Esto no es un componente “listo para usar” sin más. Hay que entender de qué estamos hablando. Lo que si facilita es la estructuración y la escritura de las etiquetas.
Como guardamos la info en arrays, hay unos límites de órdenes y ordenantes. Supongo que serán suficientes pero es fácilmente modificable.
En la normativa hay muchos campos opcionales, no se ha añadido ninguno.
Se trata de los esquemas básicos, no los b2b.
Solamente se contemplan transferencias en euros, nada de cheques.
No se contemplan órdenes de devoluciones, etc.
No se hace ningún chequeo de contenidos (IBAN, BIC, etc)
Para la norma 34.14, buscar Órdenes en formato ISO 20022 para emisión de transferencias y cheques en euros por ejemplo https://empresa.lacaixa.es/deployedfiles/empresas/Estaticos/pdf/Transferenciasyficheros/Cuaderno_34_XML_Noviembre_2015.pdf Si quiere puede ir directamente al ANEXO 1. Es la parte interesante etiqueta a etiqueta. La programación de este proyecto se realizó siguiendo este ANEXO 1 etiqueta a etiqueta. Ojo! hay documentos que están desactualizados, ojo a las fechas! El último que he encontrado es de Noviembre 2015
Actualización (febrero 2016): Ya está testeado en 3 bancos españoles. Tanto la norma 19.14 como la 34.14 y los ficheros han sido aceptados.
Actualización (abril 2016): Hacemos público (en Norma 19.14) el array de ordenantes. Para poder recorrerlo y mostrarle al usuario el resumen de importes, algo así:
 for iOrdenantes:=1 to oNorma1914XML.iOrdenantes do begin
     mmFicheros.Lines.add(oNorma1914XML.listOrdenantes[iOrdenantes].sNombreOrdenante+' '+
          oNorma1914XML.listOrdenantes[iOrdenantes].sIBANOrdenante+' '+
                          uFmt_Numero2Str2(oNorma1914XML.listOrdenantes[iOrdenantes].mSumaImportes)+'€');
 end;
Espero que sea de utilidad.
Diego J. Muñoz.
Freelance.
Cocosistemas.com