This repository contains two Python scripts to be used to analyze excel output files from a Rapsodo InGame system and to analyze a TXT game play by play from the American Association of Professional Baseball. This was a side project that I worked on in conjunction with the pitching coach for the Sioux Falls Canaries while working as a Rapsodo Operator/Analyst during the 2023 season. I did not develop a web scraper to be used with these files, so all input files were manually imported. I appreciate any feedback/advice given!
Loan prediction is a crucial task in the financial industry as it helps lenders assess the creditworthiness of loan applicants and make informed decisions. In this project, we explore the application of various machine learning (ML) algorithms to predict loan repayment probabilities. By leveraging the power of ML models, we aim to improve accuracy, efficiency, and risk management in lending practices.
Report Structure
This report provides a step-by-step analysis of loan prediction using ML algorithms, culminating in the selection of the most suitable model for production deployment. The following sections outline the structure of the project:
Exploratory Data Analysis (EDA)
Data Cleaning
ML Model Selection and Evaluation
Choosing the Best Model for Production
Kaggle Notebook
You can find the complete code and analysis of this project in the following Kaggle notebook:
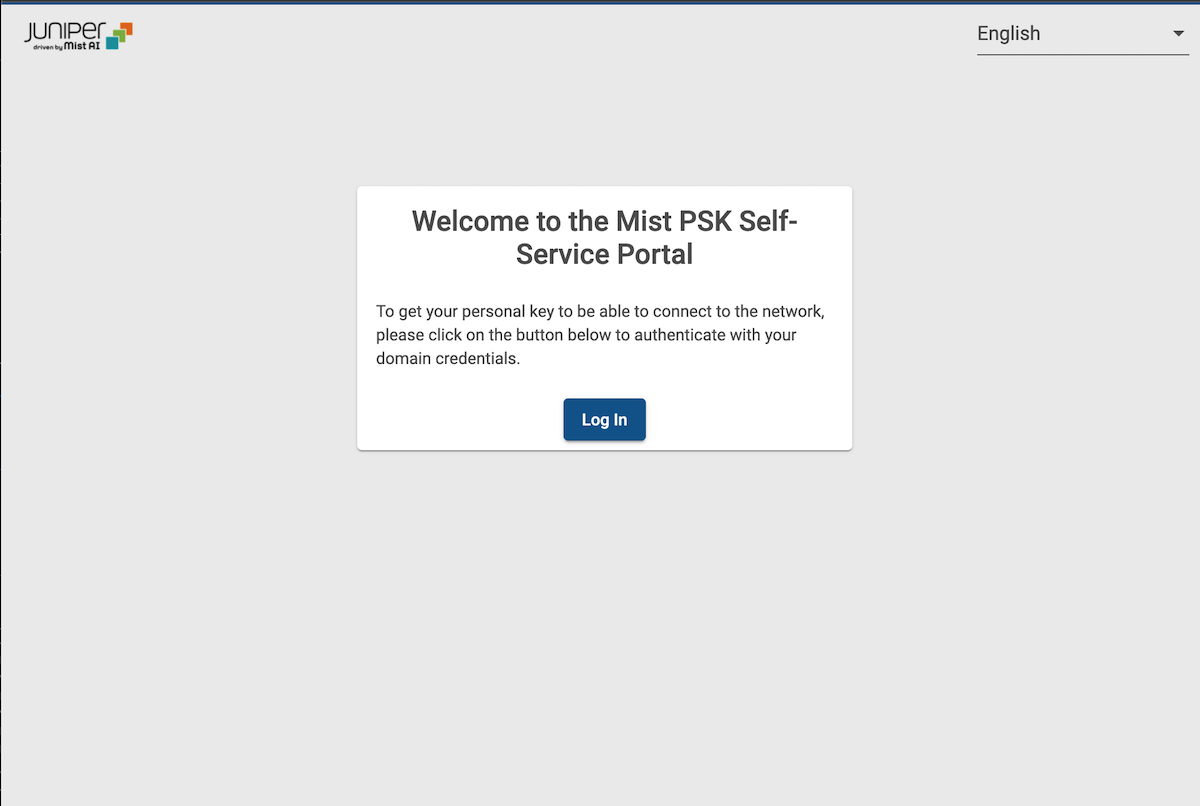
This application provides a single page app to get a Mist PSK from the Mist Cloud. This App can use AzureAD, ADFS/SAML, Okta or Google authentication.
MIT LICENSE
Copyright (c) 2021 Thomas Munzer
Permission is hereby granted, free of charge, to any person obtaining a copy of this software and associated documentation files (the “Software”), to deal in the Software without restriction, including without limitation the rights to use, copy, modify, merge, publish, distribute, sublicense, and/or sell copies of the Software, and to permit persons to whom the Software is furnished to do so, subject to the following conditions:
The above copyright notice and this permission notice shall be included in all copies or substantial portions of the Software.
THE SOFTWARE IS PROVIDED “AS IS”, WITHOUT WARRANTY OF ANY KIND, EXPRESS OR IMPLIED, INCLUDING BUT NOT LIMITED TO THE WARRANTIES OF MERCHANTABILITY, FITNESS FOR A PARTICULAR PURPOSE AND NONINFRINGEMENT. IN NO EVENT SHALL THE AUTHORS OR COPYRIGHT HOLDERS BE LIABLE FOR ANY CLAIM, DAMAGES OR OTHER LIABILITY, WHETHER IN AN ACTION OF CONTRACT, TORT OR OTHERWISE, ARISING FROM, OUT OF OR IN CONNECTION WITH THE SOFTWARE OR THE USE OR OTHER DEALINGS IN THE SOFTWARE.
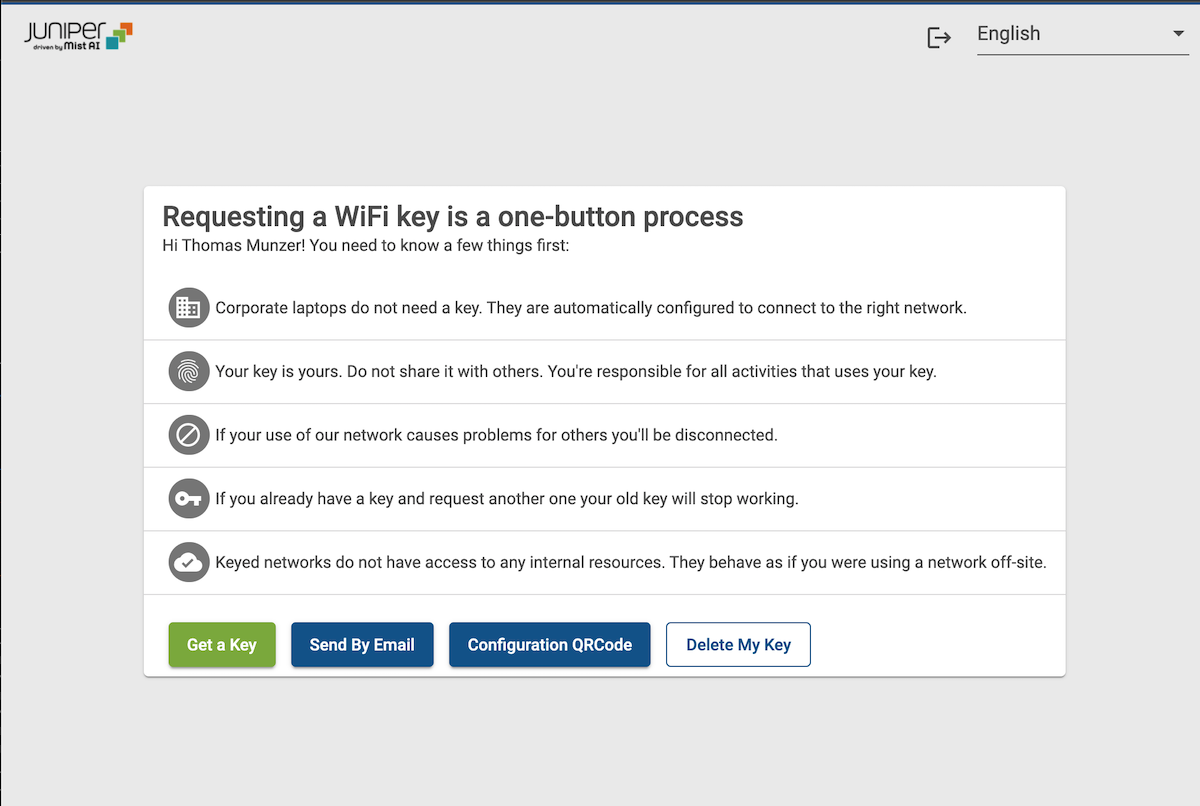
Mist PSK Self Service
Admin interface to configure:
the Mist integration
the Authentication method
the logo and colors
the translations
AzureAD, ADFS/SAML, Google and Okta integration
User self-service portal with Email and QRcode features
Install
This Reference Application can be used as a standalone Application, or it can be deployed as a Docker Image (recommanded).
Deploy the Docker version (recommanded)
This application is available as a Docker Image. The Dockerfile is also available if you want top build it on your own.
Configuration can be done through the config file. An example of the config.js file can be found in src/config_example.js. Then, you just need to link the config.js file to /app/config.js in you container.
You can also use environment variables to configure the app:
Variable Name
Type
Default Value
Comment
NODE_HOSTNAME
string
null
Server FQDN. Used to forge the url.
NODE_PORT
int
3000
TCP Port used for HTTP
NODE_HTTPS
boolean
false
enable HTTPS in Node. require NODE_HTTPS_CERT and NODE_HTTPS_KEY
NODE_PORT_HTTPS
int
3443
TCP Port used for HTTPS.. Only used if NODE_HTTPS == true
NODE_HTTPS_CERT
string
null
certificate file name for HTTPS. The certificate file must be placed inside the src/certs/ folder
NODE_HTTPS_KEY
string
null
certificate key file name for HTTPS. The certificate key file must be placed inside the src/certs/ folder
MONGO_HOSTNAME
string
null
Mongo server hostname
MONGO_DB
string
mpss
Mongo Database name
MONGO_USER
string
null
If the Mongo server require authentication
MONGO_PASSWORD
string
null
If the Mongo server require authentication
MONGO_ENC_KEY
string
null
Used to encrypt the data stored inside the Mongo DB. If not set, the data will be store in cleartext. Can be generated with openssl rand -base64 32 command
MONGO_SIG_KEY
string
null
Used to encrypt the data stored inside the Mongo DB. If not set, the data will be store in cleartext. Can be generated with openssl rand -base64 64 command
SMTP_HOSTNAME
string
null
SMTP server FQDN or IP Address
SMTP_PORT
int
25
SMTP_SECURE
boolean
false
indicate NODE to use STARTTLS or SSL/TLS to communicate with the SMTP server
SMTP_REJECT_UNAUTHORIZED
boolean
true
if SMTP_SECCUR==true, reject SMTP Server with invalid certificates
SMTP_USER
string
null
SMTP user account (if authentication is required)
SMTP_PASSWORD
string
null
SMTP user password (if authentication is required)
Enable the QRCode function on the portal and in the emails
GOOGLE_CLIENTID
string
null
Google API Client_ID if Google Auth is used
GOOGLE_CLIENTSECRET
string
null
Google API Client_Secret if Google Auth is used
APP_DISCLAIMER
string
null
Disclaimer to display on the Admin login page
Permanent storage
This App is storing ADFS/SAML information used for the SSO process. You can use a permanent storage to keep the same settings even if the container is restarting. I will simply show the basic procedure here to use a permanent storage:
Create a data directory on a suitable volume on your host system, e.g. /my/own/datadir.
Start your app container like this:
$ docker run --name some-name -v /my/own/datadir:/app/certs -d tmunzer/mpss
The -v /my/own/datadir:/app/certs part of the command mounts the /my/own/datadir directory from the underlying host system as /app/certs inside the container, where Mpss by default will store the certificates.
Configure the APP settings, in the src/config.js file. You will find an example in src/config_example.js. With Docker deployment, all the settings can be configured by using Environment Variables (see below)
Install npm packages (npm install from the project folder).
Start the APP with npm start from the src folder
Manage HTTPS at the application level
If you want to use OAuth authentication, the application will need to use HTTPS. To do so, you can use a reverse Proxy (NGINX, Apache, …) and manage the certificates at the reverse proxy level, or you can configure the app to enable HTTPS. In this case:
Edit the config.js to enable HTTP
Place you certificate and certificate key in the src/certs folder. The certificate and key must be name based on the names configured in the config.jsfile
Start the APP with npm start from the src folder
Security concerns
It is very important to protect your Mongo DB from external access.
This application needs some critical information to be able to create/delete/retrieve the users’ PSK. For example, the application need the Mist API Token, the Mist org_id and Mist site_id. These information can be used by afterward by malicious users to access your Mist Organization.
To protect your data, be sure to:
Block all the external access to your Mongo DB
Protect your Mongo DB with authentication
It is also possible to encypt most of the information stored by the application by setting the MONGO_ENC_KEY and MONGO_SIG_KEY configuration variables (or encKey and sigKey in the config.js file).
Migrate from unencrypted DB to encrypted DB
** WARNING: Be sure to backup your DB before starting the migration **
If you start to use the application without setting the encription and signature keys, the application already stored some data unencrypted.
You can use the encrypt_db.js node script to automatically encrypt the data in your DB. To do so, just configure the encyption and signature keys, start the script (node ./encypt_db.js from the src folder). If the script ended succesfully, you can start the app again (npm start) with the encryption settings set.
Deep Neuroevolution Toolbox is a collection of code additions, changes and scripts for Uber AI’s Deep Neuroevolution and Atari Zoo to target personal academic research.
About
This software package applies patches to Deep Neuroevolution to allow flexible GPU and CPU allocation for cluster use. The targeted cluster uses Scientific Linux 6.10 and Sun Grid Engine 6.2u5p3 as the scheduler.
Atari Zoo has been adapted to work with frozen models from this Deep Neuroevolution implementation. The code is only targeting the generation of activation movies, and may not operate correctly with the additional features Atari Zoo provides.
By typing bash install.sh at the project root, Deep Neuroevolution and Atari Zoo will be cloned, patches applied and new files copied to the required directories.
In deep-neuroevolution/gpu_implementation/neuroevolution/tf_util.py the method get_available_gpus finds unused GPUs on a node and allocates the amount specified by the parameter numGPUs. By default, this is 1. Change value according to scheduler parameters.
Allocate CPUs
In deep-neuroevolution/gpu_implementation/gym_tensorflow/tf_env.h the variable const int threads states how many CPU cores are used for the simulations. Change the value according to what was requested via the scheduler. This will require gym_tensorflow.so to be rebuilt.
This is done with the commands below:
cd deep-neuroevolution/gpu_implementation/gym_tensorflow/
make clean
make
Using the Sun Grid Scheduler (SGE)
This section provides all the details in using the provided SGE script with Deep Neuro. SGE scripts are run by the following command:
qsub scheduled_run.sge
Overview
An SGE script is provided and can be found at deep-neuroevolution/gpu_implementation/scheduled_run.sge.
A configurable directory is created at deep-neuroevolution/gpu_implementation/. Each simulation of an Atari game creates a subsequent subdirectory containing each evolutionary run. The run-x value is dictated by the SGE_TASK variable.
Each evolutionary run folder contains the printout of the program and their snapshots. Below is a visual of this structure:
This line below details how many runs a job produces.
#$ -t 1-1:1
This states the script will run a single job. If the code were to change to the following:
#$ -t 1-10:1
10 jobs would run, starting at iteration 1. The task numbers dictate the directory names.
Allocate CPU and GPU
These values MUST match those that the code has been compiled to run, see earlier section for details. See the following:
#$ -pe gpu 4 # GPU Job using 4 CPU cores#$ -l num_GTXany_per_task=1
This is requesting a GPU implementation (necessary for this code) along with 4 CPUs and 1 GPU. If you want 12 CPUs and 2 GPUS your code would look like the following:
#$ -pe gpu 12#$ -l num_GTXany_per_task=2
Choosing an environment
Parameters are needed for the script to locate the program and accompanying JSON file.
It is important to understand these parameters if you wish to change this script in the future.
PROGRAM – is a reference to the python file that runs Deep Neuro.
PARAMETER – refers to the configuration file that loads the parameters for the simulations.
DIRECTORY – is the name of the directory that will be created that holds the results for all the runs using this script.
Using snapshots
Deep Neuro implements a snapshot feature. If there is a critical error or power outage, the latest snapshot is available to load in the population of GAs to continue the simulation. This is already written into the SGE script.
let SNAPSHOT_EVERY_TIMESTEP=1000000
let RUN_TO_TIMESTEP=1000000000
RUN_TO_TIMESTEP – is how many frames the atari environments are running for.
SNAPSHOT_EVERY_TIMESTEP – creates a snapshot at every frame iteration of this value. This also creates a directory for each block of runs. Keeping the snapshots at each iteration unaffected.
Formatting atari output
The text files in each game directory are a standard output stream of the programs output data. A python script is included to convert this to a CSV file.
Located at deep-neuroevolution/gpu_implementation/formatting.py, run the script via:
python formatting.py
Point root_directory to the directory which contains the folders of atari environments. The output CSV file/s will also be in this folder.
root_directory = "./runs/"
Included are bool parameters to turn on and off whether they are needed in the CSV output.
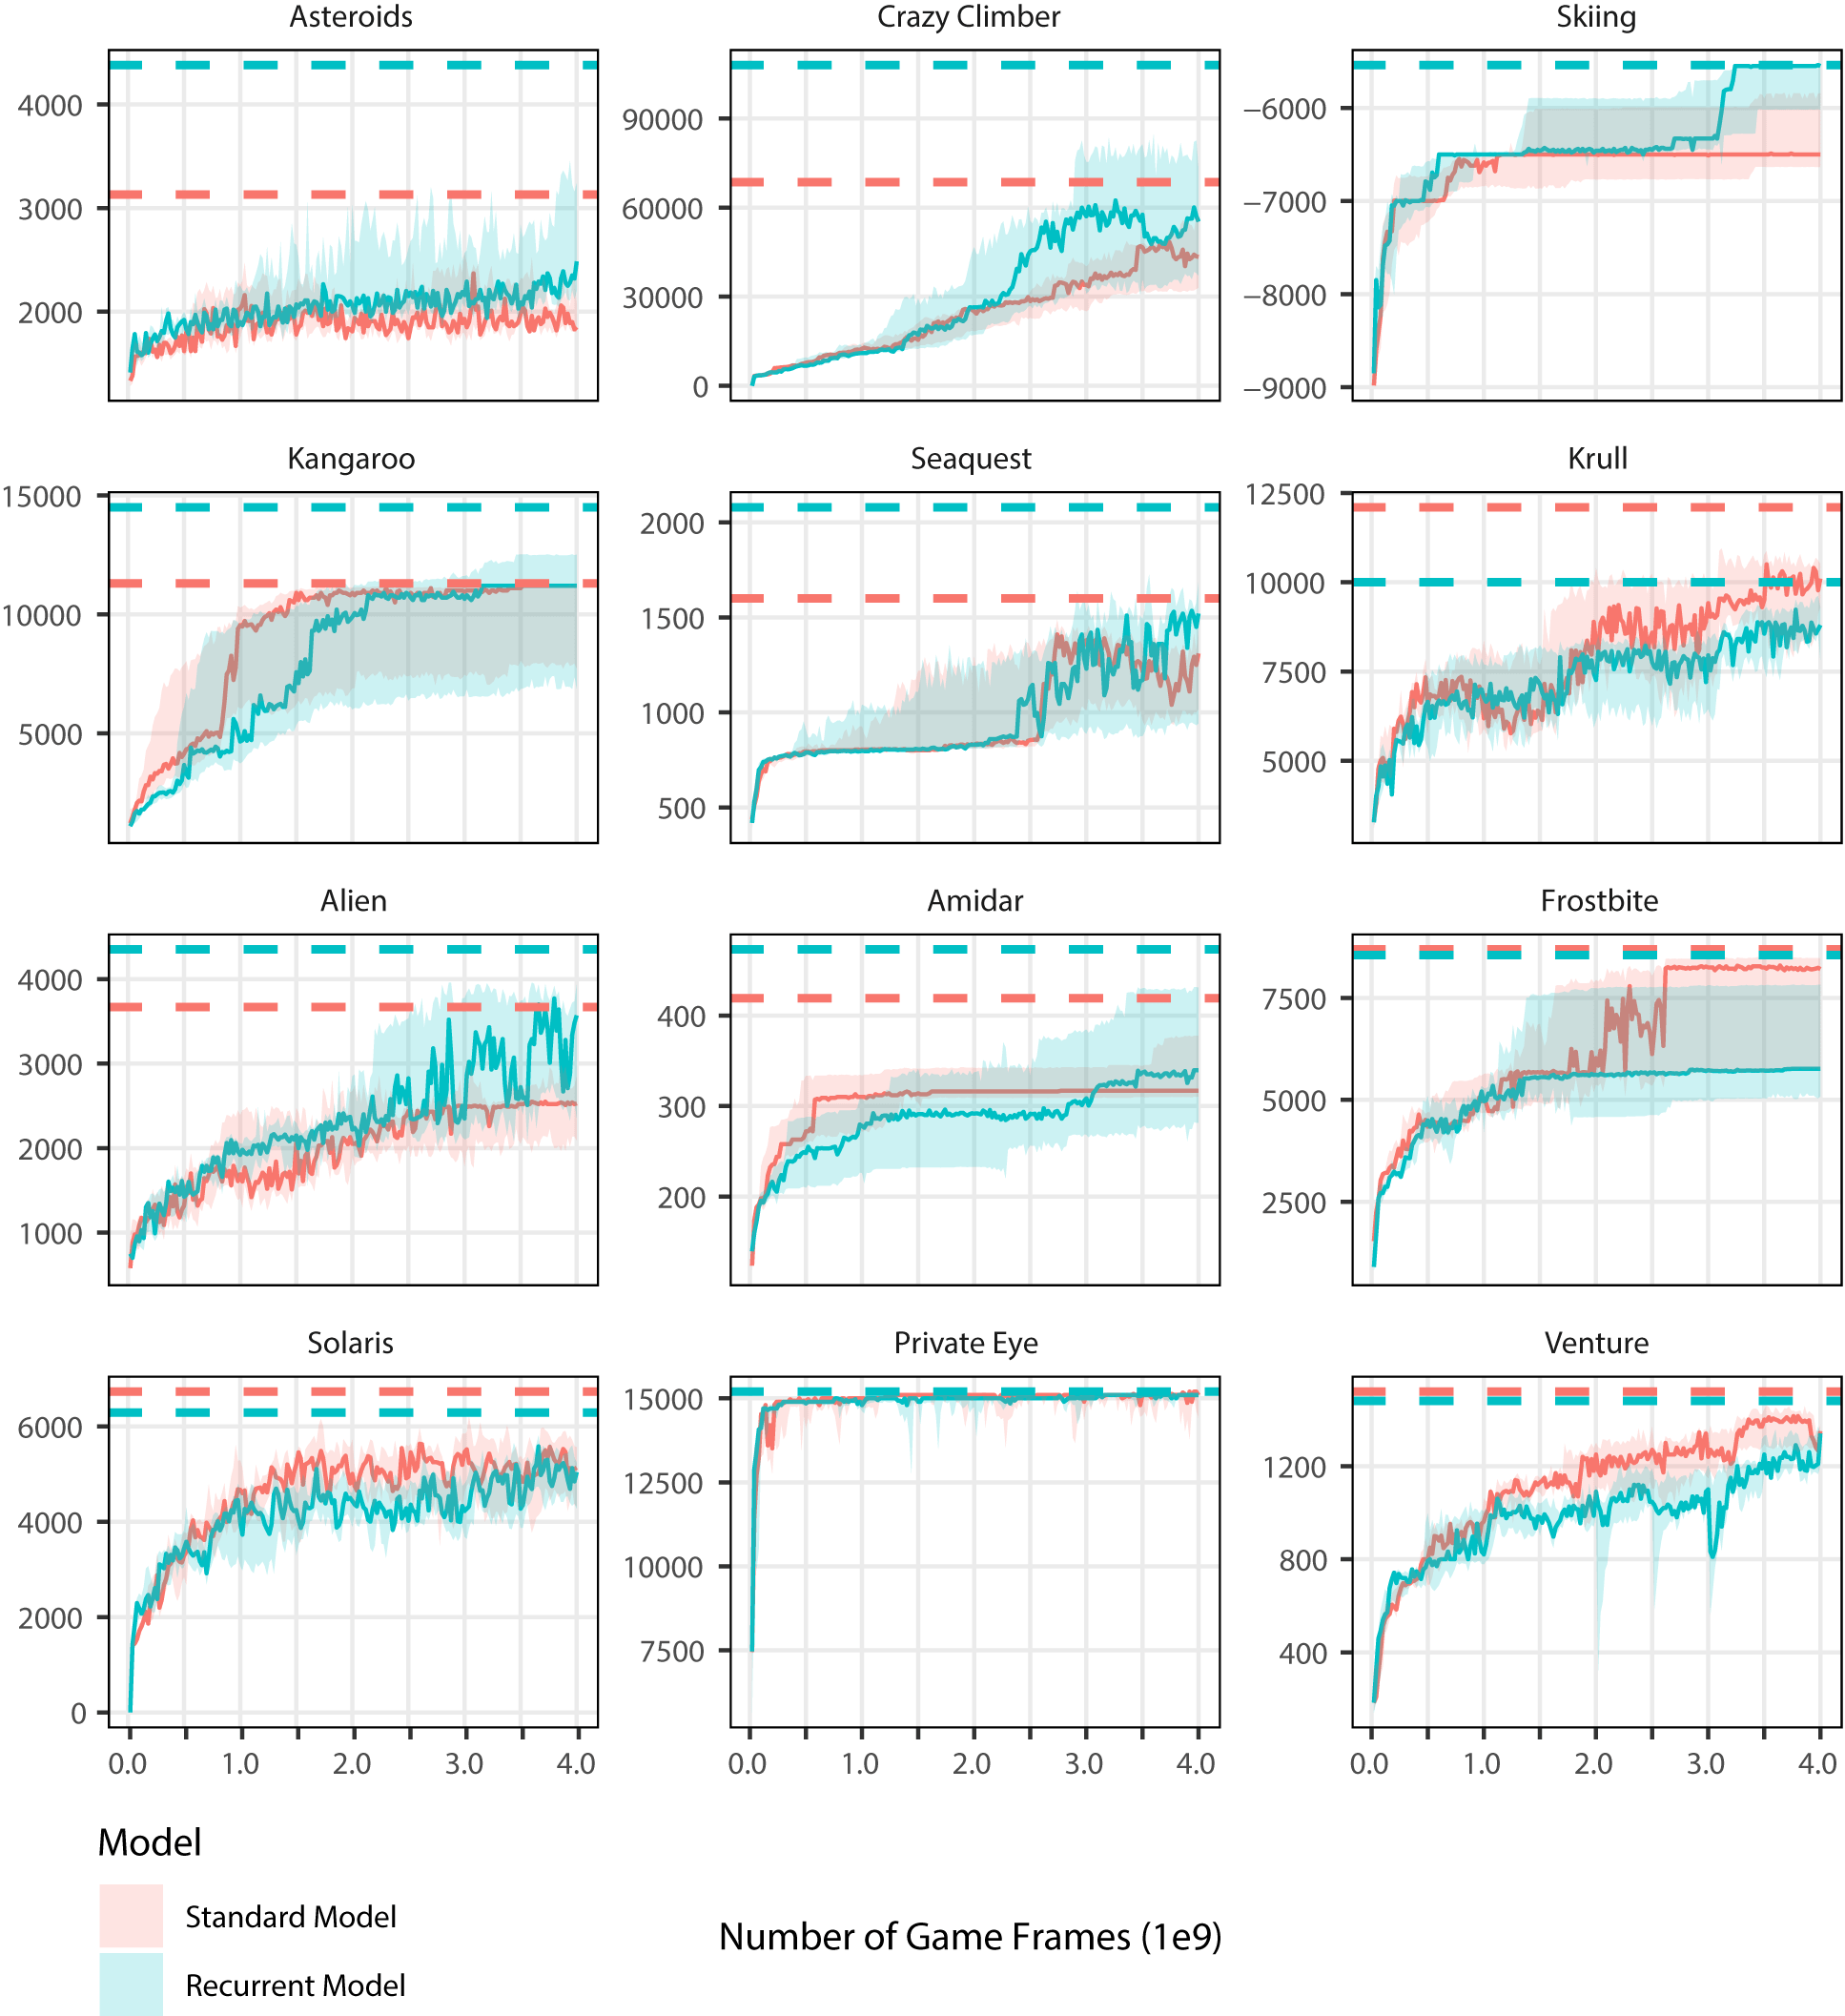
listOfGames – a list of games to plot. These names must match the CSV file/s name.
listOfModels – a list of models to plot on each sub-plot.
columnsPerGraph – the number of columns.
numOfRows – the number of rows.
Note: The script is written for 4 billion frames on the x-axis.
Example of the plot can be seen below:
Freezing model
For future automation (to-do), seeds of the models are saved to text files. These seeds are then used to freeze the model. To comply with the established Atari Zoo local dir, files are stored at ~/space/rlzoo/. So GA for Alien would be stored ~/space/rlzoo/ga/AlienNoFrameskip-v4/.
Seeds can be found in the output text files from Atari runs. They should be saved in the appropriate file dir and named like the following: GAME_MODELRUN.txt.
alien_model1_final.txt
Models are saved using the save_model.py script located at deep-neuroevolution-RC/gpu_implementation. The script requires three command-line parameters:
game – human-readable text of game that the model was trained on.
model – the learning method used to train (e.g. GA, ES, A2C).
run – the numerical value of the run.
An example of this is shown below:
python save_model.py alien ga 1
This will save the model to ~/space/rlzoo/ga/AlienNoFrameskip-v4/model1_final.pb.
Producing rollout
This produces an npz compressed file of observations of the environment at each frame. This can be used with Atari Zoo to create an activation movie.
The file rollout.py is found in atari-model-zoo/ and requires a dir location to gym_tensorflow.so to operate. Apply the dir here:
# enter the dir for the gym_tensorflow.so for 'import gym_tensorflow'sys.path.append('...')
Once done, the rollout is similar to freezing the model. The three parameters are required again:
Both save_model.py and rollout.py place the frozen model and rollout file in the correct location for Atari Zoo to create an activation movie.
Locate the file generate_video.py in atari-model-zoo/ and change the following lines accordingly:
algo='ga'env="AlienNoFrameskip-v4"run_id=1
These should mimic those used in save_model.py and rollout.py. Then run the script by:
python generate_video.py
Notes
The way in which models are frozen in this codebase is not standard with the default Atari Zoo codebase. Therefore, not all of Atari Zoo’s features are available. If your goal is to use other Atari Zoo features, that is not generating an activation video, then a more well-rounded system for freezing the model should be pursued.
The changes to Deep Neuro suit an environment in which there are shared resources, the default implementation is better suited if virtualization is available.
This repo is purely for personal academic research and has been tailored to that. This codebase may offer ideas, but I would recommend using the original code and adapting it to your specific scenario.
Gym Manager is a web app for managing clients’ subscriptions and check-ins for a gym, also enabling admins to view and monitor incomes, material resources and repairs.
Modules/Features
The app is divided into three major modules:
Admin module:
The admin is responsible in general for operations that requires writing to the database:
Adding new clients: The admin can add new clients and create/assign subscriptions
Add new payments for a client.
Change information in client’s profile
Managing packs: The admin can create, delete and view packs and their subscriptions
Analytics: The admin can view incomes and add charges for each month.
Manager module:
Managers can:
search for clients.
perform check ins for a client
view a client’s profile
Superadmin module:
The superadmin is only responsible for managing users and roles (access control).
Development server (angular cli)
First clone the repo: git clone git@github.com:salah3x/gym-webapp.git
Install dependencies for the web app (assuming node, npm and ng are already installed): cd gym-webapp && npm install
Install dependencies for the backend project: cd functions && npm install
Run cd .. to navigate back to the parent folder.
Run ng serve for a dev server.
Navigate to http://localhost:4200/. The app will automatically reload if you change any of the source files.
Development server (firebase cli)
Serve the angular web app (content of dist/gym-webapp) locally: npm run serve
This is used to emulate the firebase hosting plan, use ng serve for development instead.
Serve the cloud functions locally: npm --prefix functions run serve
Build
Run ng build to build the project. The build artifacts will be stored in the dist/gym-webapp directory. Use the --prod flag for a production build.
Authenticate the cli and access Firebase projects: firebase login
Initialize your site (choose the dist/gym-webapp folder for the hosting plan): firebase init
Deploy the angular web app to Firebase: npm run deploy
Deploy the backend to cloud functions: npm --prefix functions run deploy
Or deploy everything using firebase cli: firebase deploy (This will deploy the angular web app, the express backend, the cloud storage rules and firestore rules & indexes)
The deployment phase will build the projects first and do some linting.
Internationalization
The web app has support for i18n, it already supports English and French.
By default the build command generates the english version of the app, run npm run start:fr for a dev server or npm run build:fr-prod to build the french version for production.
To support other languages:
1 – Copy the src/locale/messages.xlf to src/locale/messages.[LANG].xlf
2 – Translate the file to the target language. (You can use an XLIFF editor)
3 – [Optional] Add a [LANG] configuration in angular.json (See the fr configuration in the build and serve config)
4 – run ng serve --configuration=[LANG] for a dev server.
5 – run ng build --prod --i18n-locale [LANG] --i18n-format xlf --i18n-file src/locale/messages.[LANG].xlf to build the app for production.
For more information about i18n and how to translate an xlf file check out the official docs.
Further help
To get more help on the Angular CLI use ng help or go check out the Angular CLI README.
To get started with firebase go to the firebase console and create your first project.
To get more information about firebase cli use firebase --help or visit the official docs.
This project was generated with Angular CLI version 7.3.4.
The Crypt password provides a set of classes that can be used for encrypting and hashing data.
Interfaces
PasswordInterface
PasswordInterface is an interface that requires a class to be implemented with a create and a verify method.
The create method should take a plain text password and a type and return a hashed password.
The verify method should accept a plain text password and a hashed password and return a boolean indicating whether or not the password matched the password in the hash.
The PasswordInterface interface defines the following constants for use with implementations:
PasswordInterface::BLOWFISH
PasswordInterface::JOOMLA
PasswordInterface::MD5
PasswordInterface::PBKDF
Classes
Password\Simple
Usage
In addition to the interface PasswordInterface there is also a basic implementation provided which provides for use with the most common password schemes. This if found in the Password\Simple class.
Aside from the two methods create and verify methods, this implementation also adds an additional method called setCost. This method is used to set a cost parameter for methods that support workload factors. It takes an integer cost factor as a parameter.
Password\Simple provides support for bcrypt, MD5 and the traditional Joomla! CMS hashing scheme. The hash format can be specified during hash creation by using the constants PasswordInterface::BLOWFISH, PasswordInterface::MD5, PasswordInterface::JOOMLA, and PasswordInterface::PBKDF. An appropriate salt will be automatically generated when required.
Installation via Composer
Add "joomla/crypt": "~3.0" to the require block in your composer.json and then run composer install`.
{
	"require": {
		"joomla/crypt": "~3.0"
	}
}
Alternatively, you can simply run the following from the command line:
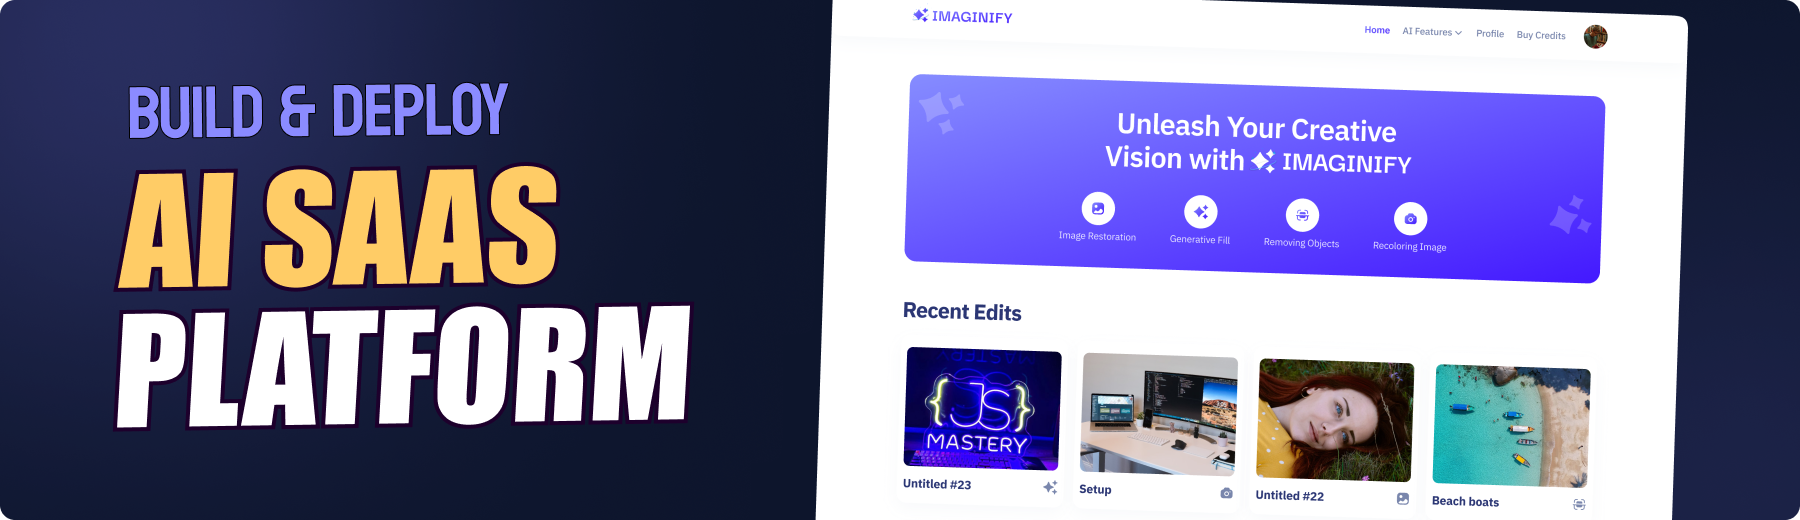
An AI image SaaS platform that excels in image processing capabilities, integrates a secure payment infrastructure, offers advanced image search functionalities, and supports multiple AI features, including image restoration, recoloring, object removal, generative filling, and background removal.
Replace the placeholder values with your actual respective account credentials. You can obtain these credentials by signing up on Clerk and refer to its Webhook Setup, MongoDB, Cloudinary and Stripe
This is just a simple Markov text toy. Use ircawp-learn to build a “brain” (just a big messy blob of json), and then ircawp-phrase to generate a sentence based on the contents of the brain.
This sort of thing goes in:
There is a theory which states that if ever anyone discovers exactly what the Universe is for and why it is here, it will instantly disappear and be replaced by something even more bizarre and inexplicable. There is another theory which states that this has already happened.

Many were increasingly of the opinion that they'd all made a big mistake in coming down from the trees in the first place. And some said that even the trees had been a bad move, and that no one should ever have left the oceans.

"My doctor says that I have a malformed public-duty gland and a natural deficiency in moral fibre," Ford muttered to himself, "and that I am therefore excused from saving Universes."

The ships hung in the sky in much the same way that bricks don't.

"You know," said Arthur, "it's at times like this, when I'm trapped in a Vogon airlock with a man from Betelgeuse, and about to die of asphyxiation in deep space that I really wish I'd listened to what my mother told me when I was young."

[...etc]
…and this sort of nonsense comes out…
Protect me when light with some way off.

It seemed to need to convert Fahrenheit to the dolphins because he had always assumed that I decided a man who most want to fill the sea, all the ingenuity of magic.

Shee, you stare at the huskies have left the water having a good time.

Eskimos had so much the only thing to know about in drifts, snow that people have speculated that any people miserable with.

"You know," said Arthur, "it's at the bowl of complete fools."
Setup and sample usage
Setup
The only real requirement is jsonpickle, but feel free to use the requirements.txt file if you’re feeling saucy.
Generate a brain
You’ll find some sample brains in the appropriately named directory, but if you want to rebuild them, let’s build a brain out of some Hitchhiker’s quotes:
tzk (TiddlyZettelKasten)
is a TiddlyWiki edition and associated CLI
for maintaining personal notes
in something approaching the Zettelkasten method.
It’s updated periodically from whatever tooling I’m currently using
in my own thinking workspace.
As such, it’s currently considered alpha-quality;
while it ought to be very stable and there’s no meaningful risk of data loss,
updating to a newer version might be difficult
and I’m unlikely to accept patches
unless they’re something I want for myself.
This is intended primarily as a nice starting platform
on which to build your own tooling.
Some basic knowledge of TiddlyWiki
is necessary and assumed.
Documentation / Installation
Find a live version of the edition on the web with further instructions
at https://sobjornstad.github.io/tzk/.
You can find the documentation for the CLI
(which handles creating the wiki,
versioning with Git,
and creating public and other derivative versions of the wiki)
at https://tzk.readthedocs.io/en/latest/.
Video walkthrough
Since tzk is still in an alpha state,
general instructions on how to use it are somewhat lacking at the moment.
To fill in the gap in the meantime,
I recorded an hour-long walkthrough showing how you might take notes using tzk;
you can select individual sections to watch if that’s longer than you want.
Watch the video on YouTube.


